Customize list views
Overview
When you create an object, Skedulo automatically generates a set of pages that enable you to add, edit, and view your data:
- Create record page – Record data and add to your object.
- Edit record page – Edit individual records.
- View record page – View individual records.
- List view page – View all data associated with an object in a list.
These pages are rendered from templates and it is these templates that can be edited in order to customize how you gather and present your data.
A List view defines the data that is displayed when you navigate to a list of records for a given object. When you view a list view page, it usually displays a subset of the fields belonging to the object. Edit your list view template to configure how users can view or interact with the displayed data.
All List views are built on, or extend, the base-listview template. This base template contains the blocks that build the structure of your list view. You can omit any of the variables from the base template by overriding the list view template for your object.
The default list view template
When you create a custom object, a list view template is generated that contains the resource_name, the view_uid, the page title, and the name of the template that it extends–in this case, the base-listview template. For example, if you create an object called Aircraft, the auto-generated list view template will contain the following elements:
{% extends "base-listview" %}

{% block title %}aircraft{% endblock title %}

{% set view_uid="aircraft-list" %}
{% set resource_name="aircraft" %}
This template renders as a standard list view page with a header containing the save, sort, filter, and columns options. If there is no data associated with the object, the list view is empty.

The default list view page for a custom object contains only one field, which links to an item’s record page. To view data from any custom fields you have created, you must manually add the columns you want to be displayed using the settings on the Edit default columns page.
Locate the default list view template
To locate the template of your auto-generated List view page:
- Navigate to Settings > Developer tools > Platform settings (beta).
- On the Platform page list, locate the template you want to edit. List view page templates are all suffixed with
-list. For example,aircraft-list,invoice-list,arcade-machines-list. - Click a template’s Name to open it in Page editor mode.
Preview a list view page
There are two ways to preview a List view page:
- On the Platform page list, click the Slug name of the page you want to preview.
- In the address bar, append your environment address with
/platform/page/and then the slug name of the page you want to view. For example, the address of the list view page for theinvoiceobject might look as follows:https://MyTenant.my.skedulo.com/platform/page/invoice-list
Configure the header
The header is defined by the header block in the base-listview:
{% block header %}
  <brz-page-header page-title="{% block title %}{% endblock title %}"></brz-page-header>
{% endblock header %}
The default list view page header for custom objects only displays a title, but using Breeze components you can configure it to display a subtitle, avatar, status labels, action buttons, and add descriptive content.
To configure the header on your List view page, add a header block to your template beneath the resource_name element. You can then add all the components you want to include on the page header within this block.
Using the aircraft object as an example, the following changes can be made to the header of your list view page. This isn’t an exhaustive list, so refer to the Design System documentation to explore the full capabilities.
Title
If all you want to change about your header is the title, then you can edit the text between the title tags to edit the title of your page.
{% block title %}Aircraft{% endblock title %}
If you want to make further changes to the header, add the brz-page-header component to the header block and add the title as a property. For example:
{% block header %}
  <brz-page-header page-title="Aircraft"></brz-page-header>
{% endblock header %}
Subtitle
A subtitle can provide additional context to users about the List view page. To include a subtitle in your header bar, you can use slot="subtitle" in a div element beneath the brz-page-header component:
{% block header %}
<brz-page-header page-title="Aircraft">
  <div slot="subtitle">Fleet status and availability</div>
</brz-page-header>
{% endblock header %}
Alternatively, if you want to align the subtitle with another element, like an icon, you could use the brz-row component to group them. For example:
{% block header %}
<brz-page-header page-title="Aircraft">
  <brz-row slot="subtitle">
    <brz-icon icon="details"></brz-icon>
    <span>Fleet status and availability</span>
  </brz-row>
</brz-page-header>
{% endblock header %}
Action button
Adding an action button to the list view page header can, for example, provide quick access to another page. To add a button, use the brz-button component and wrap it around the link to page you want the button to open.
<brz-button element="a" href="/platform/page/aircraft-create" slot="actions">
  Add new record
</brz-button>
For information on how to change the appearance and position of the button, see the Button section of the Design System documentation.
Avatar
Add an image to your header with the brz-avatar component and img-src prop and provide a relative or absolute URL to an image file. For best results it should be an exact square of 130px width and height because this component does not resize, crop, or otherwise transform images.
<brz-avatar size="large" theme="solid" label="Your label" image-src="Your image URL" slot="decorator">
  </brz-avatar>
For more information about avatars, see the Avatar section of the Design System documentation
Quick search
Quick search enables you to quickly find a single item on a list view page without using the Filter records modal.
To enable Quick search on your list view page, add the {% set can_search=true %} variable to your -list template. A search bar is added to the header beside the Sort, Filter, and Columns options.
{% extends "base-listview" %}

{% set view_uid="arcade-games-list" %}
{% set resource_name="Arcade Games" %}
{% set can_search=true %}
Delete rows
Add the ability to delete one or more rows from your list view using the bulk_actions variable.
{% set bulk_actions="[{ \"action\": \"delete\", \"label\": \"Delete\", \"confirmationMessage\": \"Are you sure?\" }]" %}
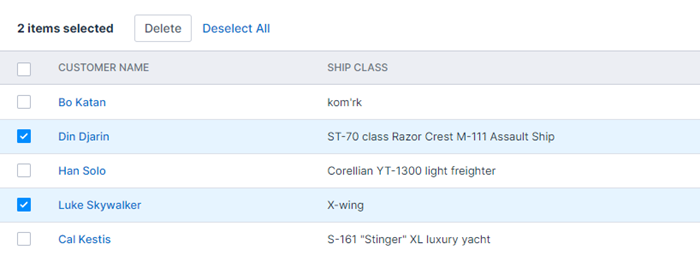
When bulk_actions is added to a List view, a check box is added to the first column header enabling you to select all rows on a page, and check boxes are added to each row, enabling you to select one or more items.
When items are selected, the Delete and Deselect All options are available.
Feedback
Was this page helpful?