Deprecated: Build and deploy multiple pages as a package
Important
The Skedulo SDK is being deprecated. For more information about timelines, alternative solutions, and impacts on existing extensions, please see the deprecation notice.
While standalone web extensions are still supported by Skedulo, we recommend that you rather develop and deploy web extensions using packages and the CLI.
Packages provide the most up to date development tooling for extensions, support versioning, and automatic updates to custom content on deploy.
More information about using the CLI to develop web extensions can be found here.
A web extension is a custom web page within the Skedulo web application that provides an extended user interface that is specific to your organization. Its content can be created using any current web development technologies.
The Skedulo web application and web extensions are built using React and Typescript, and you will need to have a good understanding of both to create pages using the SDK.
You can develop either a standalone web extension or multiple extensions as part of a package for your Skedulo organization using the Skedulo Packages SDK.
If you have not already done so, download and install the SDK from the Settings > Extensions settings page in the Skedulo Web Application.
See the Installation and setup section of the Packages SDK chapter for more information.
Skedulo Packages SDK web extension components
The Packages SDK contains a boilerplate based on React and Typescript, which you can use as a starting point to build your own pages.
The boilerplate contains type definitions for the services that are injected into the page by the Skedulo web extension runtime. This chapter and examples are based on this boilerplate.
Services.ts file
The Services.ts file located in the web extension project’s source (/src/Services) folder.
This file contains all of the type definitions for the services that Skedulo injects into the web extension.
For example, we include type definitions for making GraphQL requests and mutations, error handling types, metadata types, and credentials types for fetching vocabulary:
export interface Services {
  graphQL: {
    fetch<T>(operation: GraphQLRequest, endpoint?: string): Promise<T>
    mutate(operation: GraphQLRequest, endpoint?: string): Promise<GraphQLMutationResult>
    fetchMetadataFor(model: string): Promise<IntrospectionModelType>
  },
  metadata: {
    fetchVocabulary(): Promise<Vocabulary>
  },
  errorClasses: {
    GraphQLNetworkError: GraphQLError,
    GraphQLExecutionError: GraphQLError
  },
}

export interface Profile {
  tenantId: string
  userId: string
  username: string
  roles: string[]
}

export interface Credentials {
  apiServer: string
  apiAccessToken: string

  vendor: { type: 'skedulo', url: string, token: null } | { type: 'salesforce', url: string, token: string }
}
Skedulo keeps these type definitions up to date, and any new web extensions created will have access to the newly-created type definitions.
For more information about web extension services, see Web extensions API services
DataServices.ts file
DataServices.ts is the file used to handle CRUD operations and queries you need to execute through your web extension.
CRUD operations are GraphQL queries and mutations against your schema that return the specific information you want to display or modify in your web extension.
You can use the GraphiQL web extension in the Skedulo web application to build and test your queries to ensure that they work correctly, then copy and paste the query into the DataServices.ts file.
Skedulo UI components
Skedulo provides React components for the UI as an NPM module that you can download and install in your web extension project.
If you want to use Skedulo UI components, download the Skedulo UI module in your web extensions project folder:
You can view the component library and documentation here:
You can create and develop web extensions as part of a Skedulo package, which allows you to publish a single web extension or a suite of pages alongside related web extensions, functions, and other content.
We recommend building and deploying web extensions in the context of a package rather than as a standalone web extension for a number of reasons.
- Package updates automatically uninstall old versions of web extensions when you deploy a new package version to the Skedulo web application. This is an improvement on standalone web extensions, which has nothing to tie the source code to the
Add a web extension to a Skedulo package using the SDK
Prerequisite
-
The SDK is installed and launched, and developer mode has been enabled in the Skedulo web application.
For more information about how to do this, see Skedulo Packages SDK installation and setup.
-
The Manage Packages web extension is published in your Skedulo web application.
For more information about how to do this, see Skedulo Packages.
-
In the Skedulo Packages SDK, click Managed Package to either create a new Skedulo package or open an existing one.
-
Create a new package or open a package you have already created.
a. Click Create new package to create a new Skedulo package.
Complete the information about your new package and provide an empty folder location for the package assets.
b. If you have an existing package that you want to add a web extension to, click Select existing package and provide the location for the package. Click Open Package.
-
The SDK creates the assets that you can develop within the package.
Click Add Web Extension to add a web extension to the package. (Note: Mobile Extensions and Libraries are currently in development.)
-
In the Create Webpage Project page, complete the required fields:
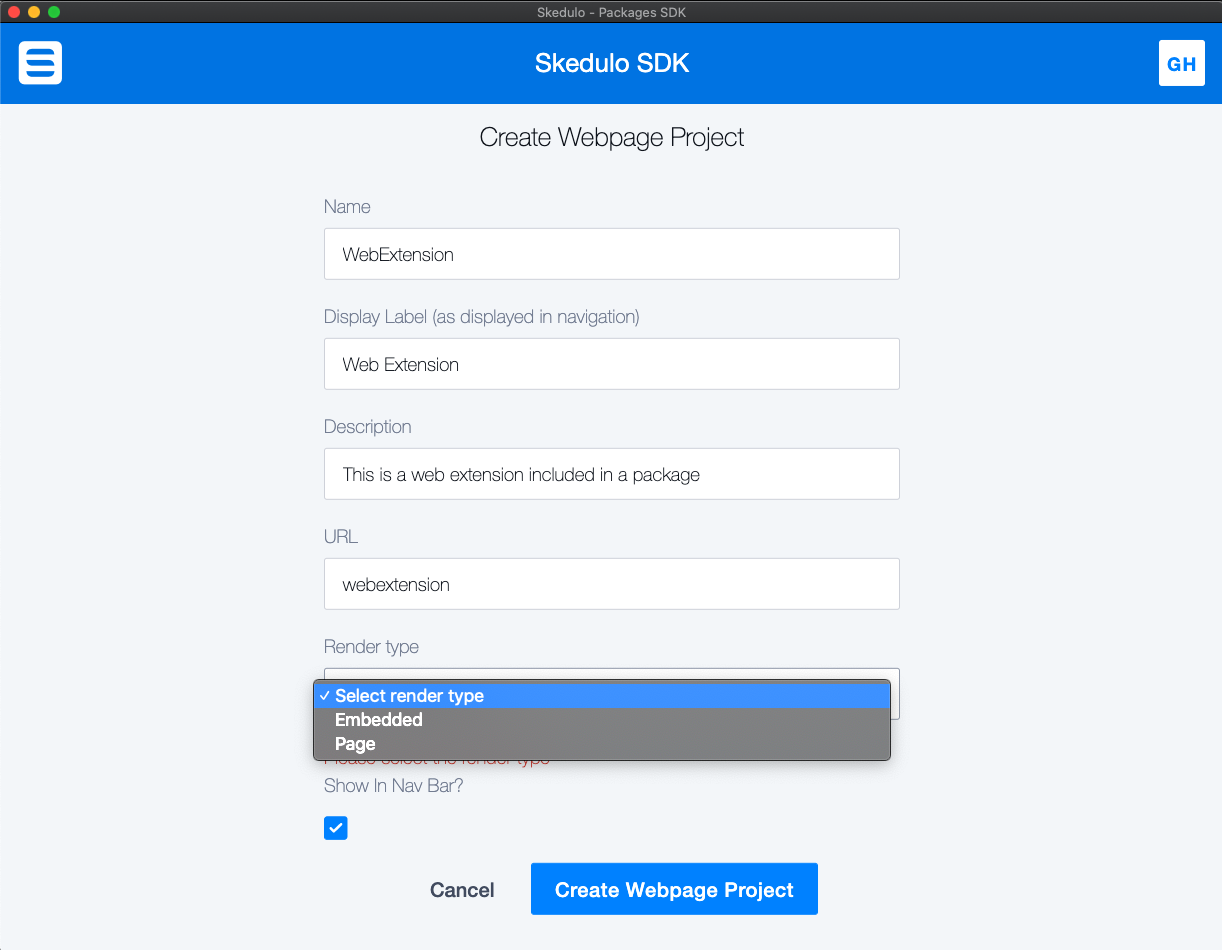
-
Name: The name of the web extension. -
Display Label: The label applied to the web extension page in the web application UI. -
Description: A description summarizing the functionality of this page. This is useful during package development as it helps distinguish this project from other web extensions in the package. -
URL: The URL field will be appended to the URL in the web extension when it is deployed in the Skedulo web application.For example, this page rendered as a page in the Skedulo web application will be available at
https://<teamname>.my.skedulo.com/c/g/webextension. -
Render type: Select from the following two render type options:- Embedded: An embedded web extension is added to either the existing Job details or Resource details page as a custom tab.
- Page: The web extension is created as a new web extension in the Skedulo web application.
If you have chosen to render your web extension as an Embedded page, select either Job details or Resource details from the Embedded hook drop down menu.
The web extension will render as a custom tab on the selected page.
-
Show In Nav Bar?: Should this page be accessible via a nav bar link?If you are intending to build a contextual page relying on context passed in via URL, this could be set to
False.
-
-
Click the Create Webpage Project to create the web extension artifacts in the Skedulo package.
The web extension appears in the list of components:
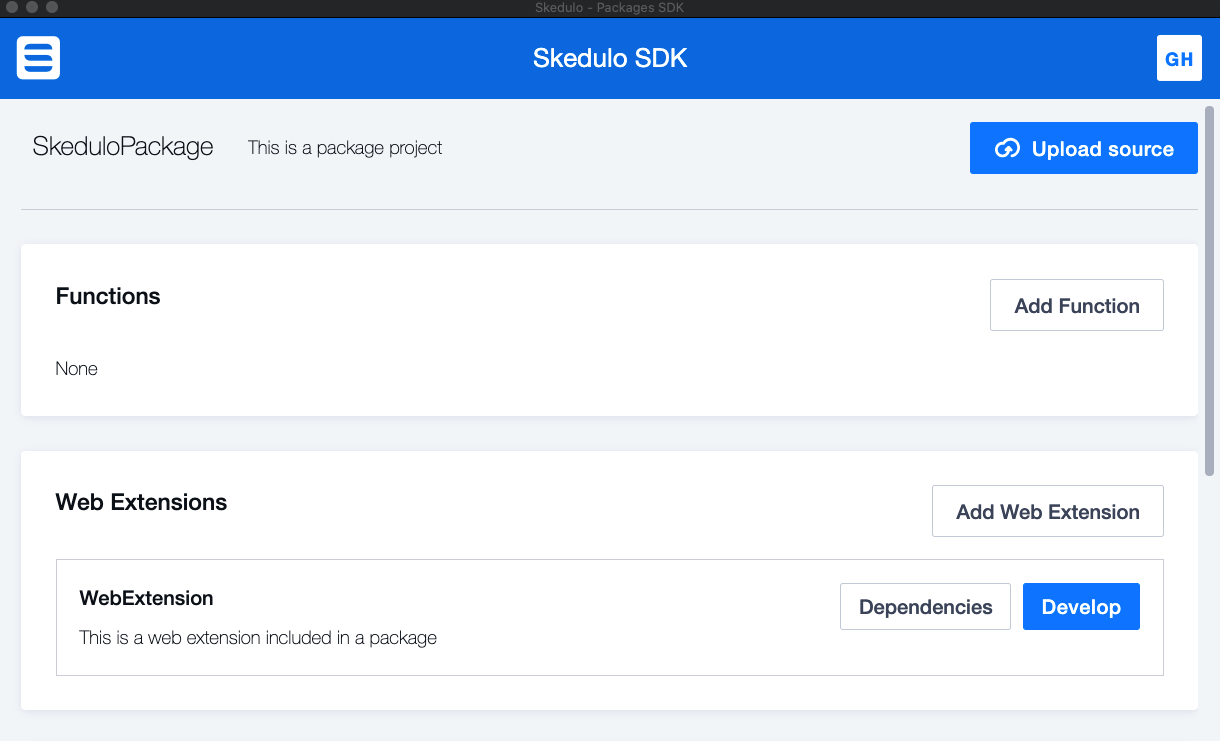
The web extension is also listed in the package’s
sked.pkg.jsonfile:{ "version":"1", "name":"SkeduloPackage", "summary":"This is a package project", "components":{ "webpages":{ "items":["WebExtension"] } } } -
Click Develop on the web extension in the SDK to open the developer console.
-
Click Bootstrap to install any dependencies and check for vulnerabilities.
-
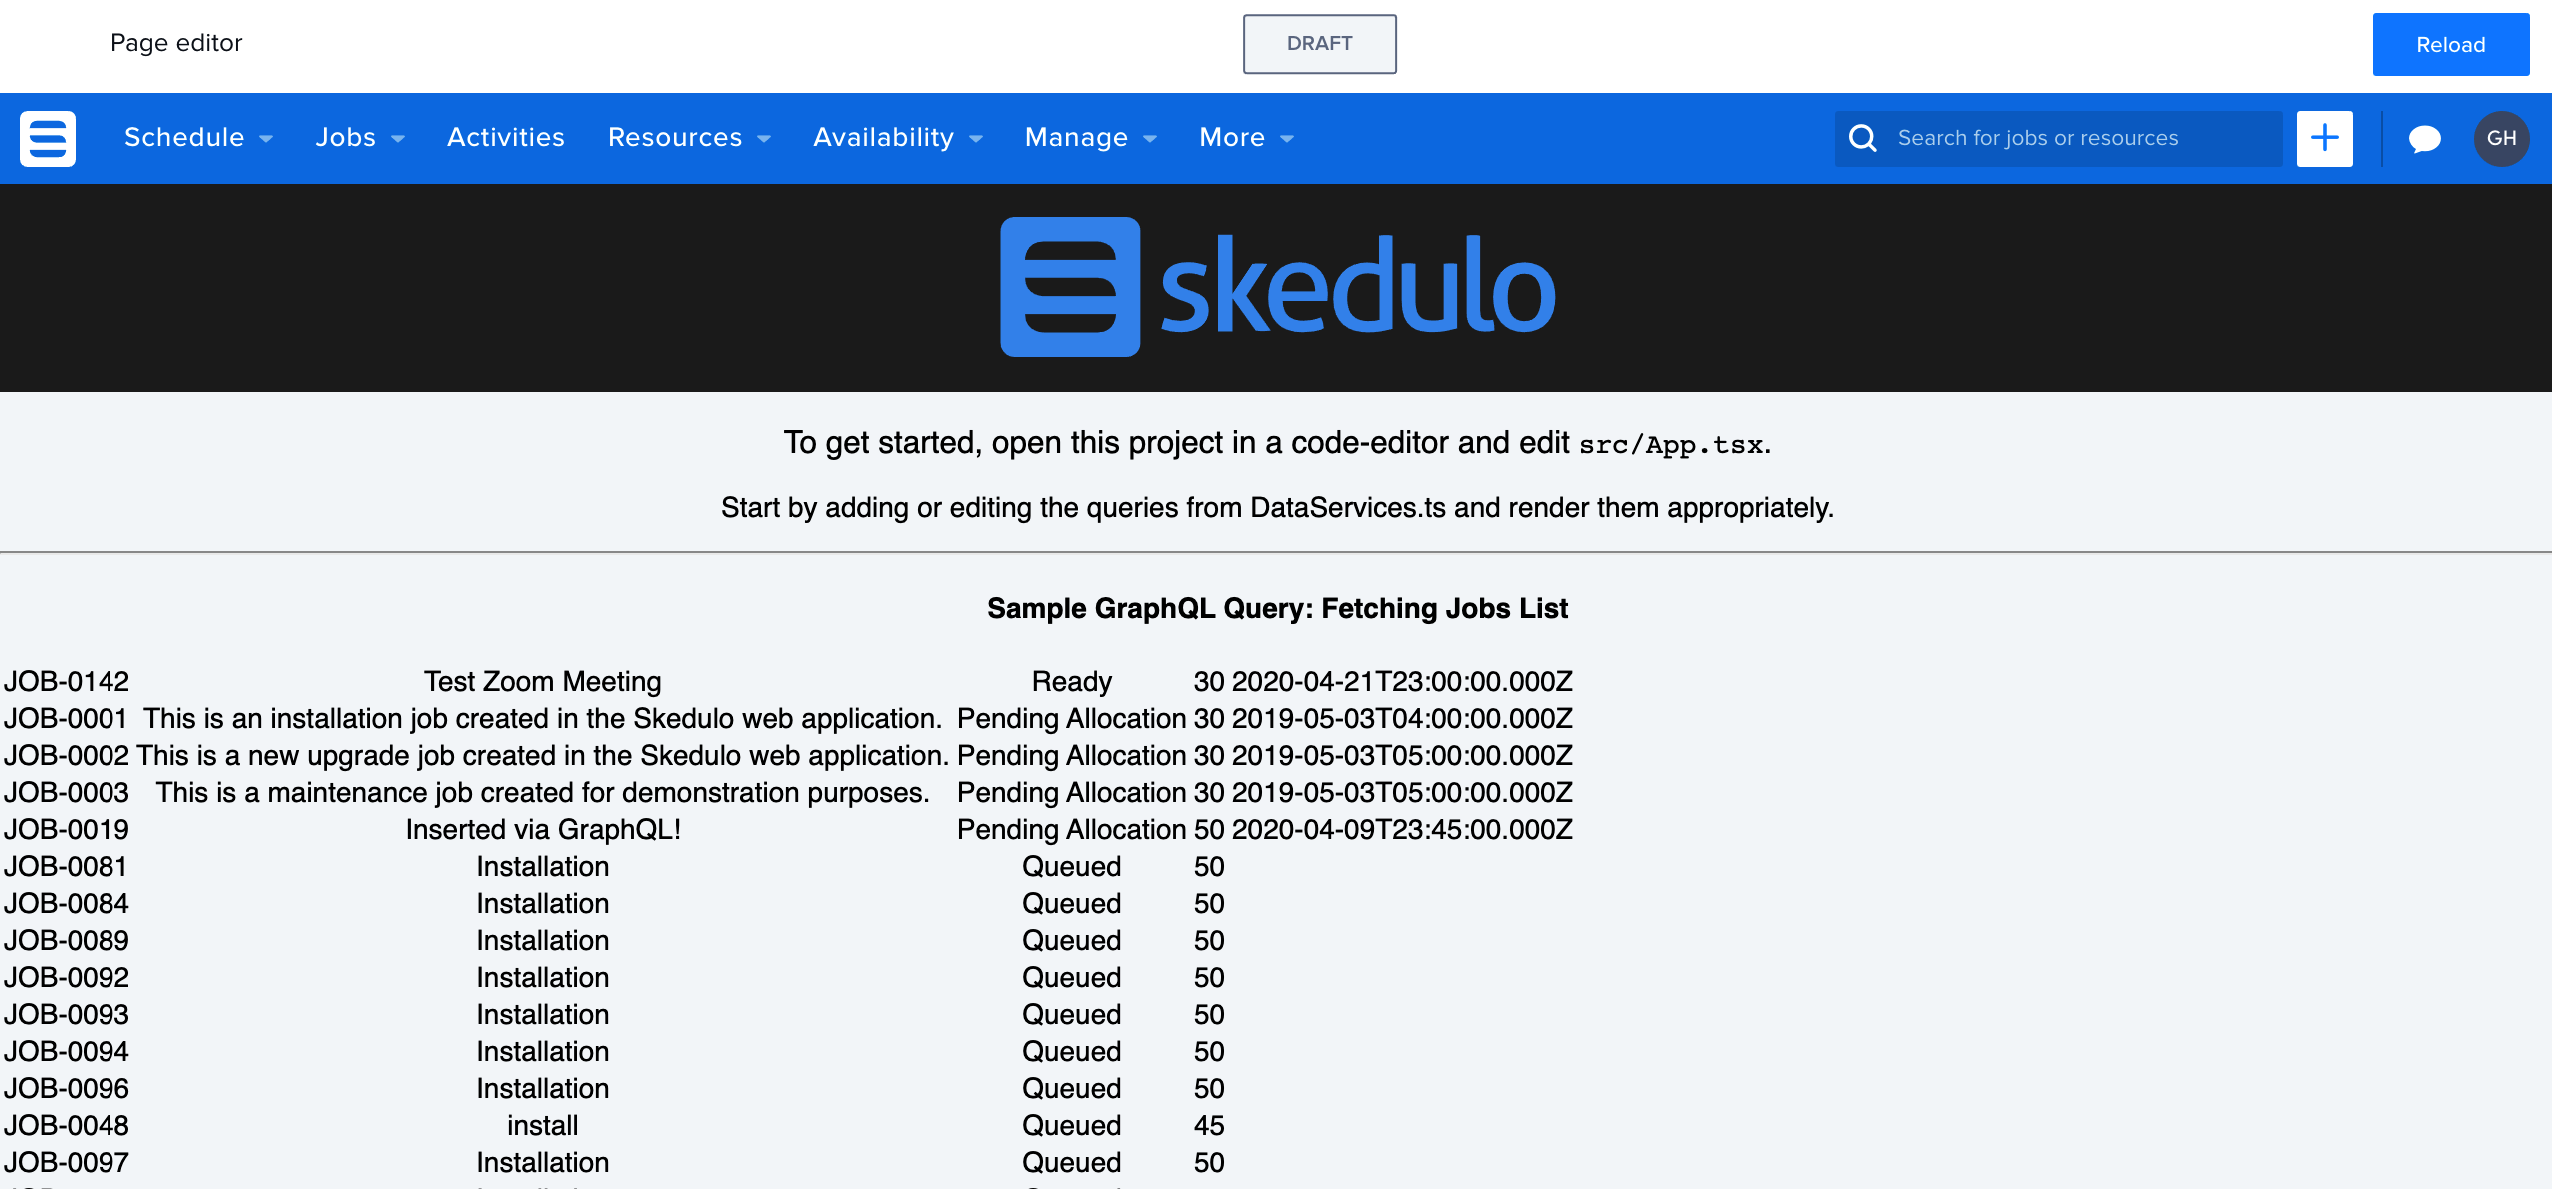
Click Start Development to start the developer environment and begin working on the web extension.
To view the page currently under development, click the URL specified at the top of the SDK window. This should be
https://<teamname.skedulo.com/c-dev -
Open the project folder to edit the following template files in an editor of your choice:
$PACKAGE_FOLDER/$WEB_EXTENSION_PROJECT/src/App.tsx$PACKAGE_FOLDER/$WEB_EXTENSION_PROJECT/src/Services/DataServices.ts$$PACKAGE_FOLDER/$WEB_EXTENSION_PROJECT/tslint.json
-
Update these files to change the data displayed.
a. In the
tslint.jsonfile, add the following line to theJSX-Rulessection:"max-line-length": [true, 240],This increases the allowable line length in the
App.tsxfile from the default(120) to240.b. Update the
DataServices.tsfile to includeJobStatus,Duration, andStartfields to the information retrieved by the GraphQL query:export interface Job { UID: string Name: string Description: string JobStatus: string Duration: string Start: string } const JobsQuery = ` { jobs(limit: 200) { edges { node { UID Name Description JobStatus Duration Start } } } } `c. Then edit the
App.tsxfile to display the new fields on the web extension:renderTableOfData = (data: AppState['data']) => { return ( <table> <tbody> { data.map(d => (<tr key={ d.UID }><td>{ d.Name }</td><td>{ d.Description }</td><td>{ d.JobStatus }</td><td>{ d.Duration }</td><td>{ d.Start }</td></tr>)) } </tbody> </table> ) }When you save the changes in the
App.tsxfile the SDK terminal automatically applies the changes and rebuilds the page. -
In the Skedulo web app page editor, click the Reload button in the upper-right of the page preview to quickly reload the contents of the page.
Publish Skedulo package web extensions
Web extensions included in a Skedulo package are published in the Skedulo web application automatically when the package is deployed to the organization.
See Deploying the package for more information.
Feedback
Was this page helpful?