Install the GraphiQL web extension
GraphiQL is an interactive, in-browser GraphQL IDE that can be used to execute GraphQL queries for test and development purposes.
The GraphQL query language provides standardized access to different backend data sources, and supports all standard Skedulo objects, custom objects, and fields.
Using GraphQL, you can query parts of the object graph to retrieve only the specific results you are interested in, rather than using separate REST endpoints for each data object. Queries are JSON-encoded and sent to a single endpoint: https://api.skedulo.com/graphql/graphql. Results are returned as a JSON object.
Enable the GraphiQL web extension
Users with Admin permissions can publish the GraphiQL web extension so that it can be accessed from the navigation menu in the web app. Whether it appears in a user’s navigation menu can be controlled via the user roles.
To enable GraphiQL in the webapp, do the following steps:
- In the web app Settings page, navigate to Developer tools > Web extensions.
- At the end of the GraphiQL row, click the three dots icon (kebab menu) and then click Publish. The status changes to Published.
- Still in the Settings page, navigate to Web app configuration > Navigation menu and then click Add menu item.
- Enter
GraphiQLin the Menu item name field and then select Web extension. - In the Destination web extension dropdown, click GraphiQL.
- In the Roles with access dropdown, select all roles that should have access to GraphiQL in the navigation menu (typically only admin and other technical roles should have access).
- Click Apply, and then optionally drag the GraphiQL item into a navigation menu tree.
Remove GraphiQL from the web app
To remove GraphiQL from the web application, complete the following steps:
- In the Settings page, navigate to Developer tools > Web extensions.
- Click the three dots icon (kebab menu) on the GraphiQL row and then click Unpublish.
- Navigate to Web app configuration > Navigation menu.
- Click the edit (pencil) icon on the GraphiQL menu item and then click Delete.
Run the GraphQL examples
You can use GraphQL to query specific fields on objects. GraphiQL includes some simple example queries for demonstration purposes. For example, execute a query to fetch the regions in your team:
query fetchRegions {
  regions {
    edges {
      node {
        UID
        Name
      }
    }
  }
}
The query returns the information about the regions that have been set up in your Skedulo web application, which may look something like the following:
{
  "data": {
    "regions": {
      "edges": [
        {
          "node": {
            "UID": "00030443-08b8-4612-a55a-75cb600e2729",
            "Name": "Brisbane"
          }
        },
        {
          "node": {
            "UID": "00035c4b-f31a-45b8-88a8-73a1a863a293",
            "Name": "Sydney"
          }
        },
        {
          "node": {
            "UID": "0003b50f-a43d-4e79-9d9d-4025357f5838",
            "Name": "Perth"
          }
        }
      ]
    }
  }
}
You can use GraphQL queries to retrieve data for your web extensions by modifying the DataServices.ts file in your web extension project directory, and display this data by using the App.tsx file to arrange and render it appropriately.
Create queries using GraphiQL
You can use GraphiQL to build and test your GraphQL queries when building web extensions.
You can use the default queries provided, or build your own using the documentation as a reference.
To view the schema Documentation Explorer, do the following:
- Click the < Docs button in the upper-right corner of the GraphiQL web extension.
From here, you can search the schema for the fields you want to include in your query.
Example: Create a new product using a GraphQL query in GraphiQL
To create a query, do the following:
-
Open the GraphiQL web extension and open the Documentation Explorer.
-
Search the schema for “NewProducts”.
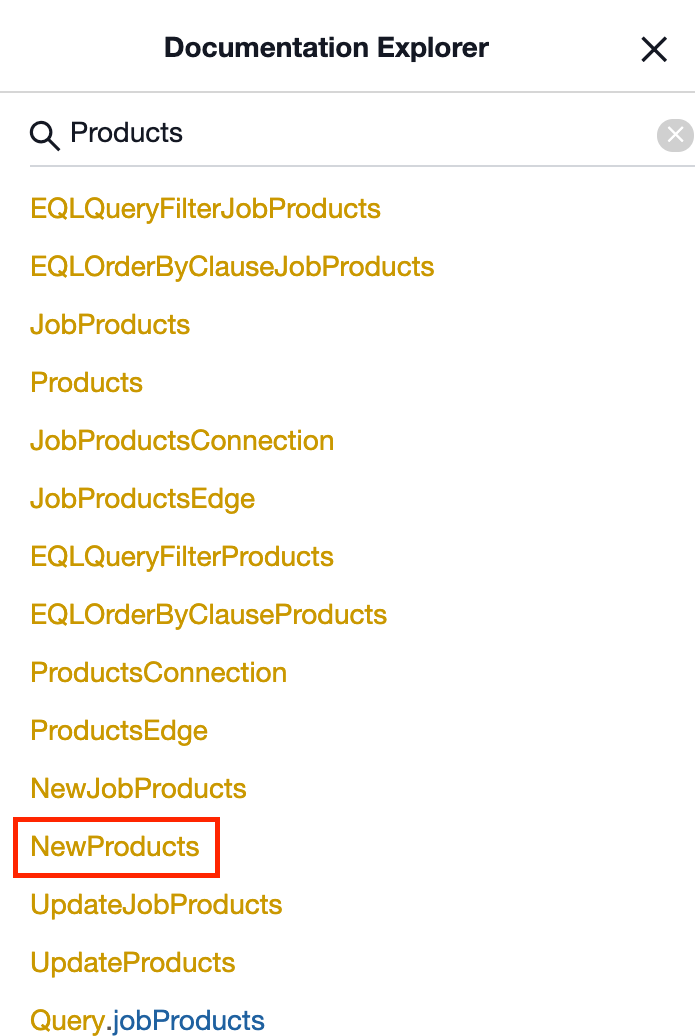
From here we can see that the list of fields that are available for the
NewProductstype. -
Write a mutation query that creates a new product. You can use the
createJobdefault query in the GraphiQL page as an example to get you started. The products mutation query has the variable name$inputwith the typeNewProductsas it appears in the schema. GraphiQl provides autocompletion and will help you fill out the fields as you go.mutation createProduct($input: NewProducts!) { schema { insertProducts(input: $input) } } -
In the Query variables textbox, provide an
$inputvariable of the typeNewProductsfor the query to run on. Again, GraphiQL will prompt you for the fields that it requires, however they are also available in the Documentation Explorer window on the right.{ "input": { "Name": "New Product", "Description": "This is a new product", "ProductCode": "P-1", "IsActive": true } } -
Click the play button and select
createProductfrom the list of queries to run the query and check that it works correctly.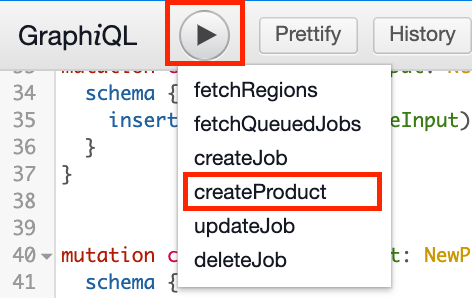
If successful, the JSON response should provide a UID for the newly created product.
{
  "data": {
    "schema": {
      "insertProducts": "001d7f7e-e1be-464f-9184-990525ad2096"
    }
  }
}
Feedback
Was this page helpful?