Change the extension title and summary
Overview
Skedulo Plus extensions use a ui_def.json file to define UI elements and the pages that make up the extension.
Corresponding language files in the static_resources/locales folder contain the localized strings for the components listed in the ui_def.json file. These files are selected automatically based on the device’s language setting and can be used to change the text displayed in the Skedulo Plus app fields and components.
This configuration, along with the metadata.json file, determines where the extension appears in the Skedulo Plus mobile app and how it behaves.
By default, the Hello World extension template you downloaded in Get started with Skedulo Plus extensions includes a page called “Hello World”.
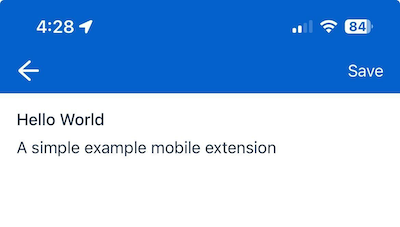
This page is defined in the ui_def.json file in the mex_definition folder of the extension:
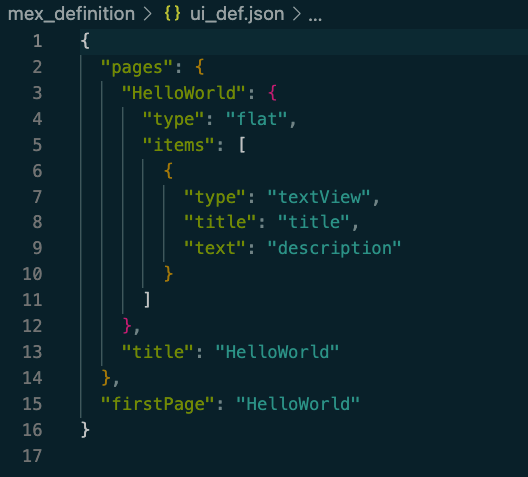
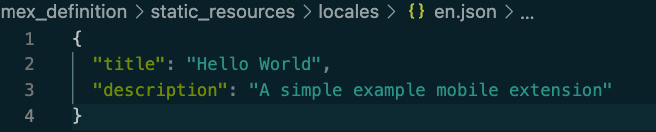
The en.json file in the static_resources/locales folder contains the localized strings for the components listed in the ui_def.json file.
You will also use these files in the next sections to add components and functionality to your extension.
Change the extension page title and summary
You can change the title of this page to better reflect the purpose of the extension for your organization by modifying the en.json localization file.
This file changes the text fields for the page configured in the ui_def.json file, but does not alter the name of the extension on the job details page.
- In your preferred IDE or text editor, open the
/mex_definition/static_resources/locales/en.jsonfile. - Change the
titlefield to a new title that better reflects the purpose of the extension. For example, you might change the title from “Hello World” to “My Skedulo Plus Extension”.{ "title": "My Skedulo Plus extension" } - Change the
summaryfield to a new summary that describes the purpose of the extension. For example:{ "summary": "This is a Skedulo Plus extension built from the Hello World template." } - Save the
en.jsonfile. - Update the extension using the Skedulo CLI.
When installed, the form looks like this:
 |
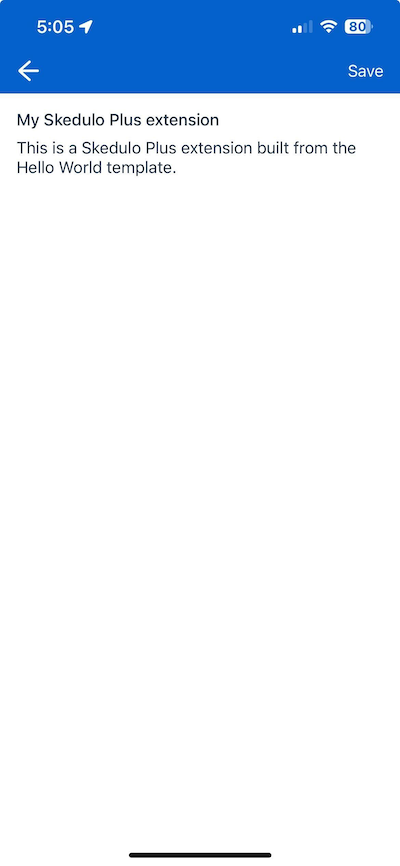 |
As you can see, the title and summary of the extension have been updated to reflect the changes made in the en.json file, however the form title and description remain the same.
Change the form title
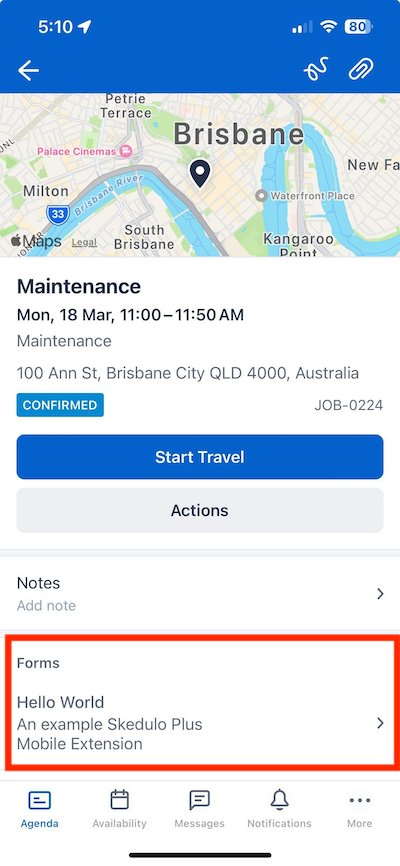
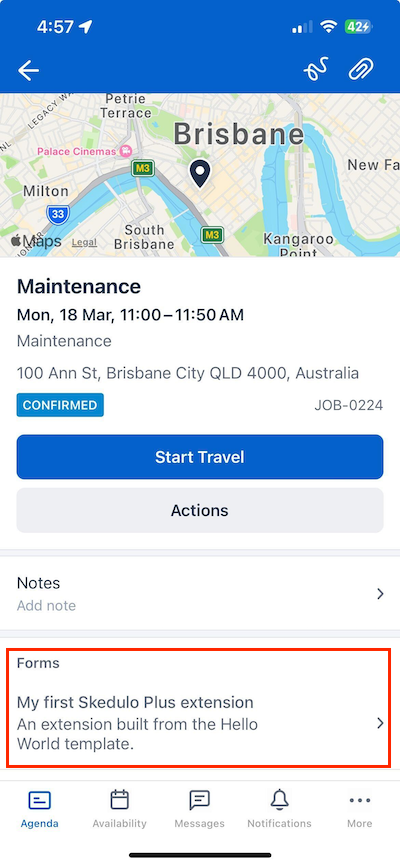
The name of the extension itself is shown on the job details screen in the Skedulo Plus app under Forms.
You can change this title by modifying the upload_config.json file. The summary shown beneath the title can also be modified in the metadata.json file.
- Open the
upload_config.jsonfile in your preferred IDE or text editor. - Change the
"name"field to a new title that better reflects the purpose of the extension for your organization. For example:{ "name": "My first Skedulo Plus extension", "defId": "HelloWorld", "engineVersion": "1.0.0" } - Save the
upload_config.jsonfile. - Update the form using the Skedulo CLI.
Add a summary
You can also add a summary to the extension using the metadata.json file. This summary will appear under the extension title in the Skedulo Plus app when the extension is installed.
The summary field is not required, but it can be used to provide a brief description of the extension.
-
Open the
metadata.jsonfile in your preferred IDE or text editor. -
Add a summary to the
metadata.jsonfile. For example:{ "email": "", "summary": "An extension built from the Hello World template.", "references": {}, "templateId": "", "displayOrder": 1, "contextObject": "Jobs", "revisionCount": 1, "hasAttachments": [] } -
Save the
metadata.jsonfile. -
Update using the Skedulo CLI. This will update the form with the new title and summary.
When installed, the form will appear in the Skedulo Plus app on the job details screen with the new title and summary.
Learn more about metadata properties in Metadata for Skedulo Plus extensions.
Feedback
Was this page helpful?