Apply time constraints to work items
Overview
When you first create a work item in the Skedulo web app, you can apply time constraints that are tied to that work item. They indicate to the scheduler that the work must (or should if possible) be scheduled within the dates and times set.
Definitions of time constraints
Time constraint
In its rawest form, a time constraint is just metadata in a record, connected to a work item that specifies either a single time, or multiple times in which a work item can, and should be (preferably) scheduled. It always contains three fields:
- Start before,
- Start after,
- End before.
You could use any, or all three fields to create a time constraint.
SLA
An SLA is different. It’s a very rigorous form of time constraint. In business terms, and from a terminology point of view, it is as the acronym suggests; a service level agreement. It usually references a starting time for the work item and has a specific interval in which it must be completed, for example, from the time you hear about the work item, it needs to be scheduled within one, five, or ten hours to fulfill your contractual obligations, and meet your customers’ expectations.
Timeslot
A timeslot is a variation of a time constraint. It has nothing to do with an SLA, or your ability to respond to a customer. It is more about constraining the time in which an appointment can be scheduled based on a booking window or time slot, for example, a booking grid with several windows of time, showing you can book an appointment many times over within a specific window. Unlike an SLA, it has a certain elasticity to it, that is, a one-hour assignment can be completed at any point within any four-hour block of time, it doesn’t have to be completed at a specified time.
Types of time constraint
In Skedulo, there are two types of work time constraints:
- SLA. This is a hard constraint. It must be done on a set date/time. It is detailed and not flexible. The “Vehicle Route Planning (VRP)” and “Suggest” features must meet these criteria.
- Timeslot. This is a soft constraint. There is some flexibility.
Tip
To see which type is applied, open the job in Salesforce, click on the Related details tab, then scroll down to locate Job Time Constraints.Optimize using time constraints
When a time constraint (SLA) is configured, the intelligent scheduling engine will respect both the dates and times that are set. For example:
- If the time constraint starts after Feb 1st at 9:00 am and ends on Feb 1st at 5:00 pm, work allocations can be suggested any time between 9:00 a.m. and 5:00 p.m. on that day.
- If the time constraint starts after Feb 1st at 9:00 a.m. and ends four days later on Feb 5th at 5:00 p.m., work allocations can be suggested any time between within this five-day period.
Configure time constraints
Time constraints can be applied to a work item in two ways:
- On the Create Job page; or,
- On the Details tab of the Work details page.
Time constraints in the Create job page
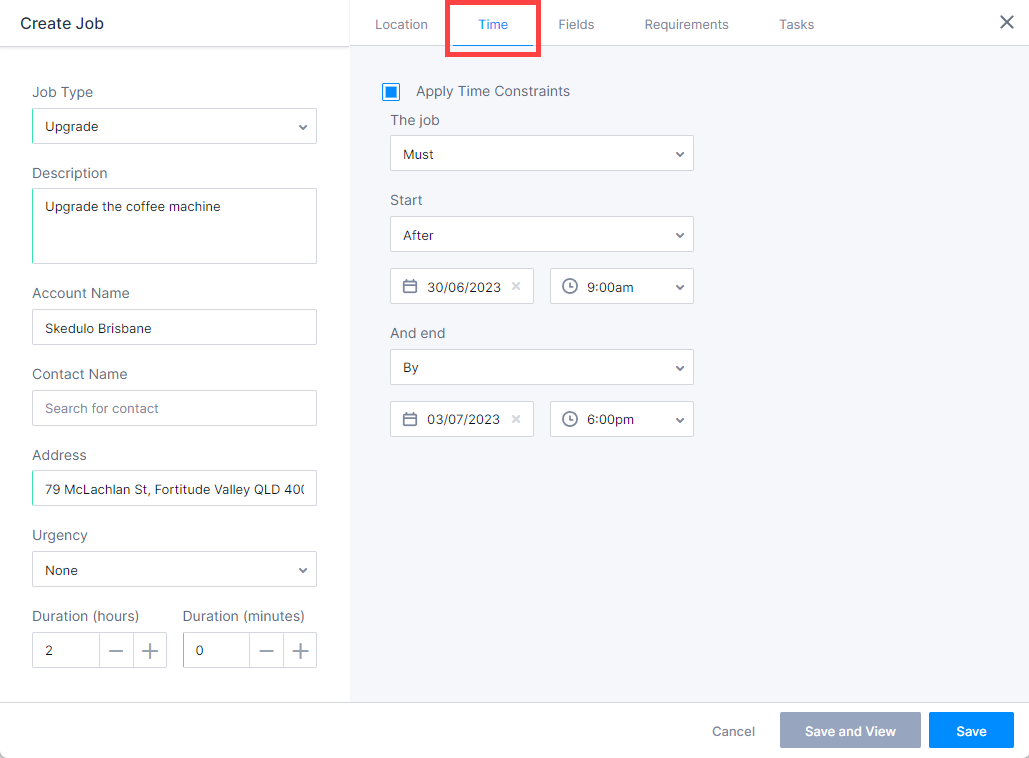
To apply time constraints when creating work using the Create Job page:
- On the Create job page, click the Time tab.
- Click Apply Time Constraints.
- Use the first drop-down to select the whether the constraint is a Must (a hard constraint) or Should (a soft constraint).
- Use the second drop-down to select the Start time constraint. There are four options:
- By, After, or Between – Select one of these options to specify a date and/or time.
- Anytime – Select this option to indicate that the work can be scheduled to start at any time.
- Use the third drop-down to select the End time constraint. There are two options:
- Anytime – Select this option to indicate that the work can be scheduled to end at any time.
- By – Select this option to specify a date and/or time.
- When all the required fields have been completed for the work item:
- Click Save to create the work item and return to the previous location in your browser history.
- Click Save and View to create the work item and open the work details page where details about the work can be changed or allocated.
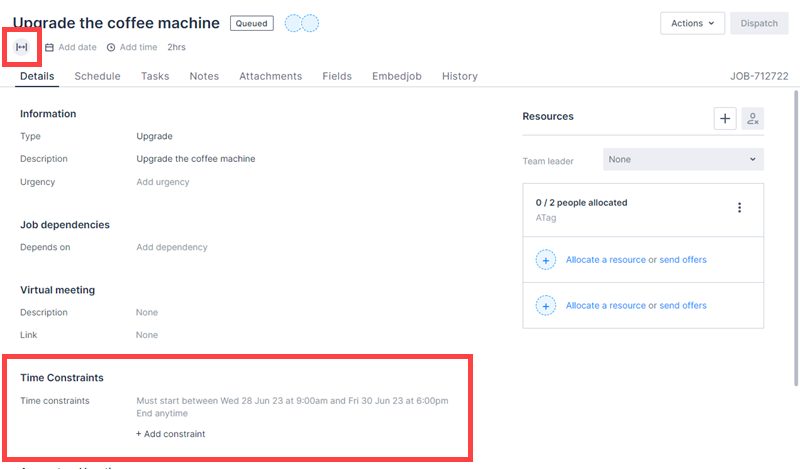
Once time constraints have been specified and saved, they can be viewed under Time constraints on the Details tab of a work item’s details page, or by hovering the cursor over the  time constraints icon on a work card in the Scheduling console.
Time constraints in the work details page
Existing time constraints can be viewed and edited in the Details tab of the Work details page. In addition, new time constraints can be added to a work item here as well.
To apply time constraints to a work item using the Work details page:
- On the Details tab, under Time Constraints, click Add Time Constraints.
- On the Add Time Constraint modal, define your constraints.
- Use the first drop-down to select the whether the constraint is a Must (a hard constraint) or Should (a soft constraint).
- Use the second drop-down to select the Start time constraint. There are four options:
- By, After, or Between – Select one of these options to specify a date and/or time.
- Anytime – Select this option to indicate that the work can be scheduled to start at any time.
- Use the third drop-down to select the End time constraint. There are two options:
- Anytime – Select this option to indicate that the work can be scheduled to end at any time.
- By – Select this option to specify a date and/or time.
- Click Save to save the time constraint and return to the Work details page.
An icon is added to the header of the work details page to indicate that a time constraint has been applied. A dark gray icon indicates that the constraints have been met. A red icon indicates that the constraints have not been met.
On the Schedule tab of the Work details page, the time constraint is represented in the following way in the swimlane:
- Diagonal hashed lines represent blocks of resource availability that should not be used to schedule the constrained job.
- Start after time is a single thin black vertical line.
- Start before is a single thin black line with arrows indicating the job should start before the line. Note that when a start time conflicts with a constraint, this line will turn red.
- End before time is a single black vertical line.
Once the job has been placed in the swimlane it can be manipulated by the scheduler.
Note
Both Optimize (VRP) and Suggest honor this hard constraint.Note
If the option Must start is used, an SLA is applied to the time constraint in Skedulo. This setting is linked to the Salesforce JTC details flag named Required, that is, Must start constraint = Required. If the Required flag is not set ( Should start is used) the time constraint will be ignored by the Optimize and Suggest auto-schedulers.
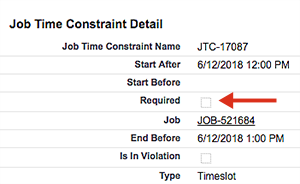
A time constraint in Salesforce CRM with the required flag turned off.
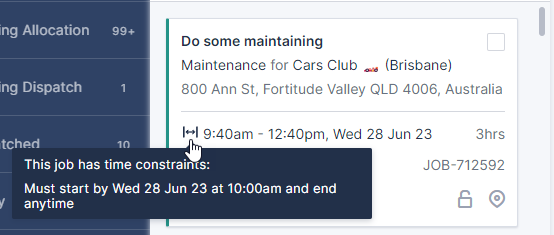
Time constraints in the Scheduling console
In the scheduling console, work items with time constraints are indicated by the time constraints icon on the work card. Move the cursor over the icon to display a tooltip with the constraint details.
A dark gray icon indicates that the constraints have been met. A red icon indicates that the constraints have not been met.
Feedback
Was this page helpful?