Horizontal swimlanes
Overview
A swimlane provides a scheduler with a visual overview of scheduled work; a real-time view of their available resources, and a summary of allocated time for a defined period.
There are two ways to view a swimlane in the scheduling console, horizontally or vertically. These options provide the user with different visual experiences, using the same level of detail.
Locate horizontal swimlanes in the Scheduling view
Swimlanes are visible from the default view of the scheduling console. Navigate to the horizontal swimlane view by selecting Schedule > Swimlane from the navigation menu.
The swimlane time grid
The swimlane time grid is graduated in blocks of one hour. There are four ways to control the visual range of the time grid:
- The date picker. Click anywhere on the date (text) to open the calendar and select a target date.
- The date switcher. Zoom to Today or step forward or backward one day at a time.
- The view selector. Choose from the available options to increase or decrease the visible time span (i.e., day, three days, or week). The co-located zoom controls allow greater detail (or less) to be displayed.
- Swimlane settings. “Only show working hours.” These settings configure the current timeline view in the swimlanes, i.e., define the time period and days of the week to view.
Note
The date above the swimlanes indicates the actual date or time span that is currently being displayed in the swimlane (this can be a single day or a date range). The jobs never disappear, they just are not displayed if they are outside the current range set here.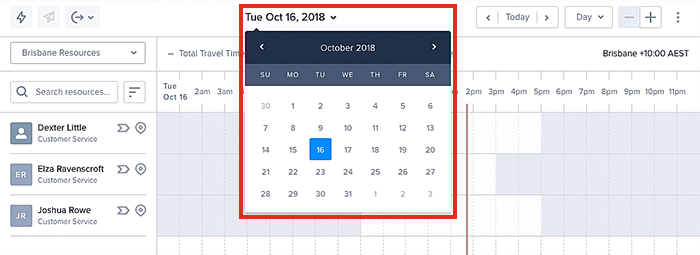
The date picker in the swimlane tab.
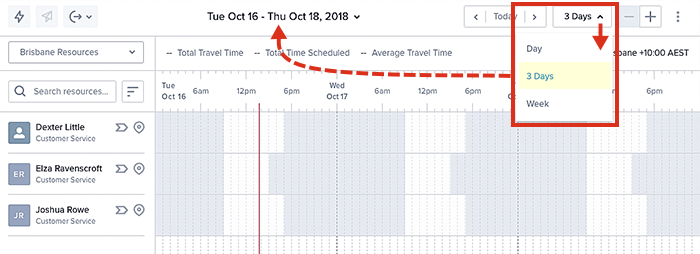
The view options in the swimlane tab.
Note
The view options also set the date range for the status panel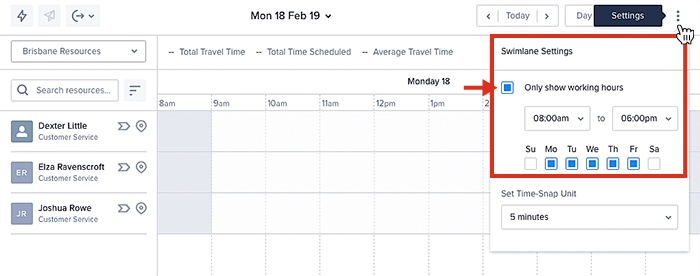
The swimlane settings.
Swimlane settings
If you only want to display certain working hours in the timeline and hide those hours and days where you do not have any work to schedule (like weekends for instance), you can configure the swimlane settings to “Only show working hours” Once selected, a time period can be set for a chosen set of days. Be aware, Schedulers can still schedule jobs outside of the swimlane working hours view—the current warnings based on availability and allocation still apply.
Note
To display working hours in the swimlanes, the option Enable Working Hours must be turned on in Settings > General.The time set in the swimlane settings is applied across all time zones and does not have a specific time zone. For example, if the time period is set from 8:00 am to 6:00 pm, then this will be the swimlane time period for all regions, regardless of their timezone.
The same swimlane settings are applied across all console swimlanes, e.g., The same settings are applied to the horizontal and vertical swimlanes, plus the job details swimlanes.
Days that are not checked will not display in the swimlanes. Combine this with the view settings (i.e., Day, 3 Days, or Week) to achieve your optimum view. Just note, some combinations may appear incorrect until you understand how it works. For example, settings for a three-day view of Monday to Friday will display the following when stepped: Monday to Wednesday, Tuesday to Thursday, Wednesday to Friday, only Thursday and Friday (not Saturday)—and when viewing Friday, Saturday and Sunday will not be shown.
When Day view is selected, if there are no working hours defined then the full 24 hours are displayed in the swimlane (so in the above example, Saturday displays 24 hours as does Sunday).
If the user interface is collapsed then the time blocks in the swimlane will reduce their graduations to best fit the new width.
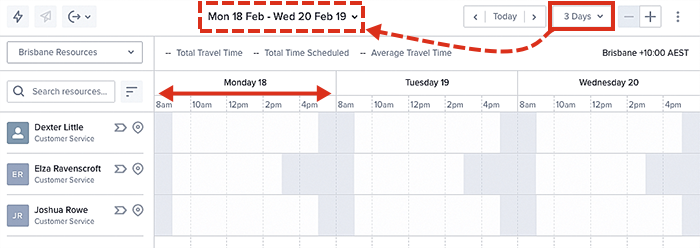
A swimlane that has been configured to show three working days, from 8 to 5.
Filter the swimlane view
Filters can be used to customize the items visible in the swimlane’s work list, however, only some of the filters will apply to the swimlane as well. You can filter the swimlanes by region, resource type, resource category, and resource tags. More information about these filters follow in the sections below.
Note that the job type filter does not affect the jobs visible in the swimlane.
Identify available resources
All available resources (that is, those who are available to work) are listed in the resource list panel on the left-hand side of the swimlanes.
Region override filter
The region override filter (located above the resource list) enables a scheduler to select multiple regions–different from that set in the main filter bar. Selecting different regions refreshes the list of resources on the swimlanes from the new region(s)–this will show their availability and any allocated jobs.
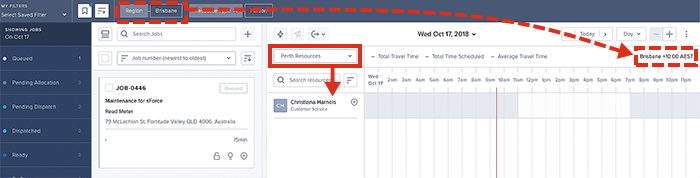
The region override filter (middle) can be set differently to the main filter bar and timezone region.
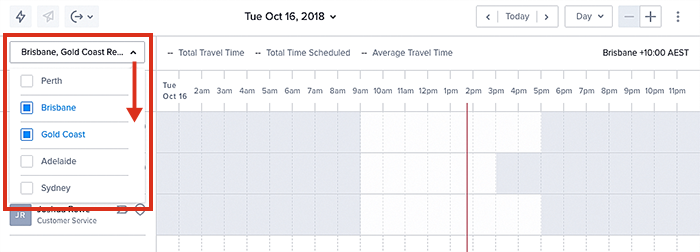
The region override filter with multiple regions selected.
Note
The region override filter only affects the swimlanes–the work list and timezone display are not affected and remain set by the main filter bar.
If a scheduler sets the region override filter to another region, the jobs and availability of the resources in that selected region (in the swimlanes) are converted to the timezone of the region set in the main filter bar.
Resource filter
The resource filter allows the scheduler to find and sort the available resources in several ways:
- Comma-separated name search–type in the name of a resource or resources (separated using commas).
- Sort alphabetically–where resources are listed “A-Z.”
- Sort by region groupings (home region first)–where resources are grouped by selected regions (selected in the region override filter); the first region is the home region (the region set in the main filter bar).
- Sort by utilization (least utilized appears first in the list). See “Definition of Utilization” below.
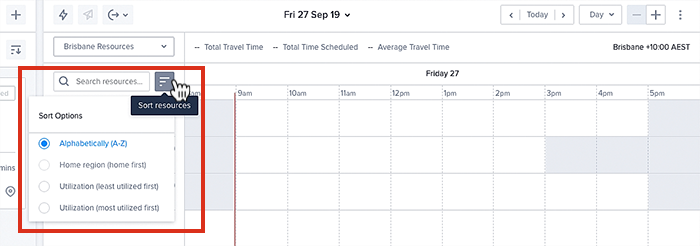
The resource filter set to show resources alphabetically–the default setting.
Note
For the region grouping option to become available (i.e., the home region option), more than one region must be selected using the region override filter–and those regions must have a latitude and longitude value defined. If the latitude and longitude are not defined, admins can do so either using the Skedulo Manage regions or directly via their CRM.Definition of Utilization
Utilization is calculated as (Availability - Unavailability) - (Job Allocations + Travel Time) within the current View selected (i.e., the viewing period set in the console swimlanes).
Unavailability includes Activities. The resource that is least utilized is the one with the highest value after this calculation.
Resource skill tags
When a resource is tagged (with skills, accreditations, etc.), they appear marked with a special icon in the available resources panel. Mouse over this icon to reveal their skills. Current skills are colored gray—those out-of-date are colored red (and have the expiry date included).
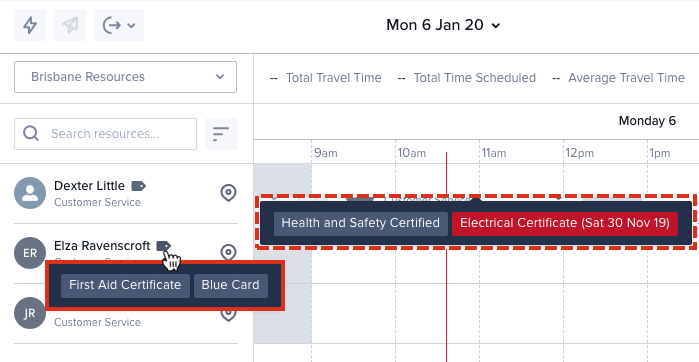
Viewing resources tag in the swimlanes.
Related links
Identify periods of availability and unavailability
Periods, where a resource is available, are displayed in white blocks in the swimlane.
Periods of time where a resource is unavailable (or is scheduled to become unavailable), are represented as blocks of gray.
The swimlane showing periods of availability (white), activity (purple) and unavailability (shades of gray).
Related links
Job cards in the swimlane
Job cards from the work list can be manually added to a swimlane using the drag-and-drop method.
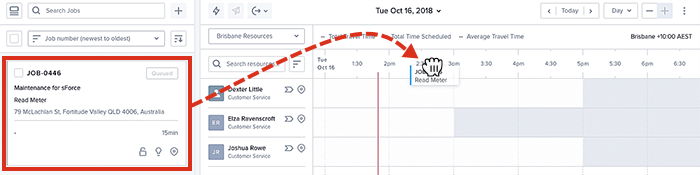
A job card being dropped into a swimlane.
Each job card located in the swimlanes denotes the job’s name (number), the job’s description, the start/end time of the job, and to whom it is assigned (as each swimlane is dedicated to a single resource).
Job cards reflect the current status of the job using different colors on the left-hand border of each card:
- Pending Dispatch (Dark Green).
- Dispatched (Light Blue).
- Ready (Dark Blue).
- En Route (Light Purple).
- On Site (Pink).
- In Progress (Orange).
- Complete (Light Green).
The same color coding is used in the Job Details view and on the map view (for the status indicators used on job markers).
Clicking directly on a job card will launch a pop-up summary of the job’s details. To view its full details, click on the job number at the top-left of the job card. Click away from the pop-up to close it.
A job card in a swimlane.
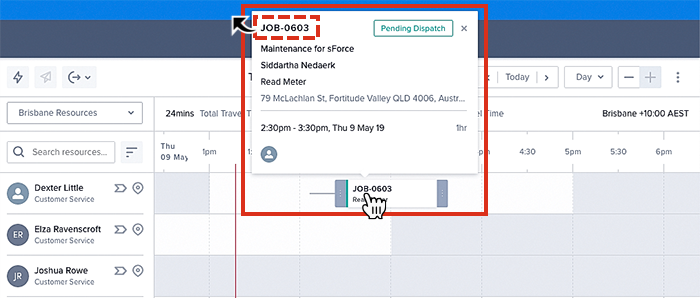
Click on the job card to reveal its details.
Related links
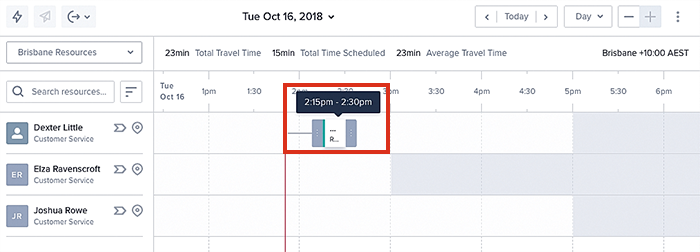
Once in a swimlane, a job card can have its time duration adjusted. The card has two small black handles, one positioned at the start time of the job, the other at the end-time. To adjust the time, grab one of the small black handles and slide it left or right, snapping it into place. The snap increment can be fine-tuned using the settings option (accessed via the three dots icon at the top-right, above the swimlanes). This change of time duration will be reflected in the job’s details.
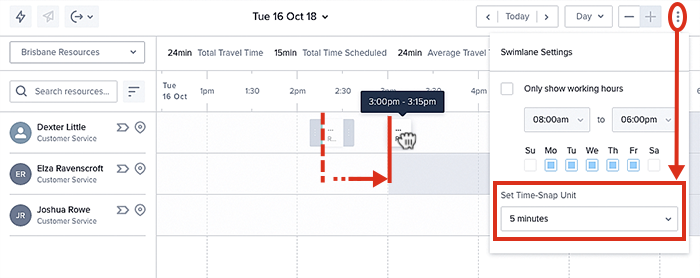
The time duration of a job card being increased in 5 minutes increments.
Job cards can also be moved to a different time, day, or week by grabbing and sliding the card along the swimlane, snapping it into its new time slot.
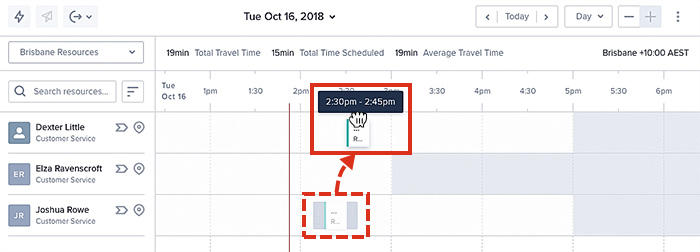
A job card is moved from one swimlane to another, to a different time.
Right-clicking on a job card in the swimlanes gives the following options:
- Dispatch.
- Unschedule.
- Cancel job.
- Open in new tab.
To inspect the job’s full details, select “Open in new tab,” this opens the job details view in a new browser tab.
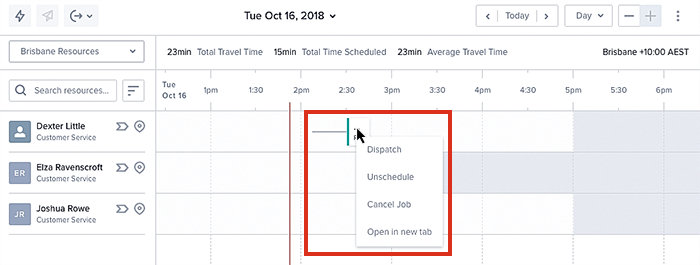
Right-click options for job cards in the swimlanes.
If an allocated job overlaps another (i.e., they share the same timeslot(s), in part or whole), then the scheduler is notified with a colored alert (a job conflict). The alert is a small red circle with a white exclamation mark–it appears at the top-right of the job card(s) in the swimlane.
A similar alert (i.e., a red exclamation in the swimlane) will occur when a job is allocated to a resource who is unavailable.
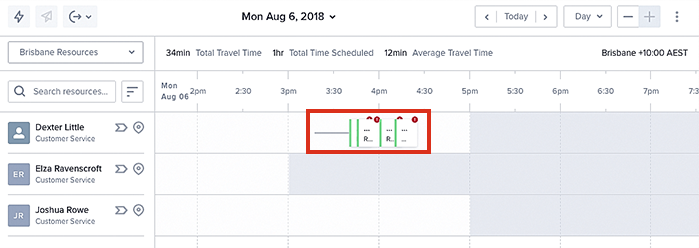
Several job cards warning they are overlapping, in the swimlanes.
If a job is categorized with some importance (e.g., critical), then the job card in the swimlane will reflect its importance using colored icons.
The built-in categories include none (the default), normal (green), urgent (orange), and critical (red).

A job card in the swimlanes marked urgent.
Activities in the Swimlane
Activities are used as placeholders for tasks that are unrelated to an external customer, such as meal breaks. They are displayed on the swimlane using purple activity cards. Once an activity has been created, it will automatically be locked, meaning it cannot be manually moved in the swimlane. A scheduler can, however, right-click on an activity card to edit or delete the activity.
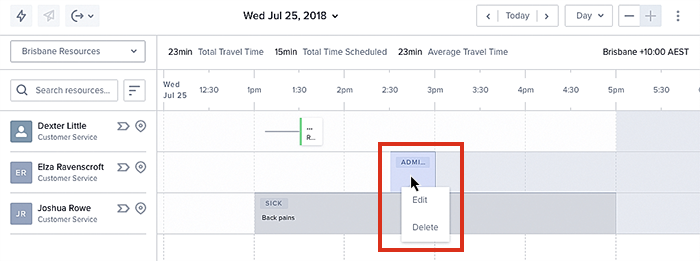
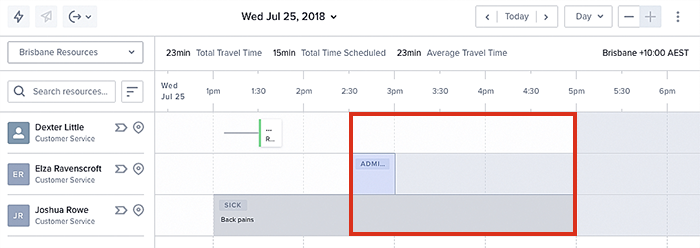
The swimlane showing an activity and right-click options.
Estimated travel
Estimated travel is displayed as a thin gray bar in the swimlane. It is determined when a job is allocated to a resource. It will either be calculated from the resource’s home address (for the first job of the day), or from the previous job to the next (in their daily schedule).
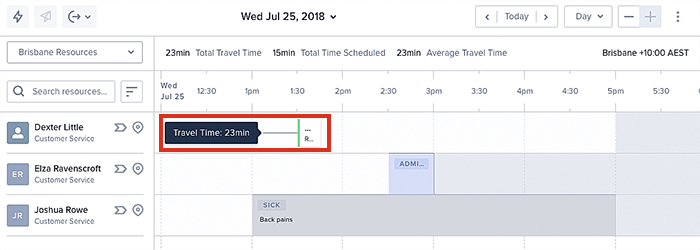
The swimlane showing a job with an estimated travel time of 23 minutes.
Tip
The “travel time” displayed in the swimlanes is calculated from the resources home address to the first job, and after from job to job, using travel times retrieved through the underlying web mapping service’s APIs.
There’s no connection between the Skedulo web app swimlanes and the “estimated” fields in Salesforce for JA.
Timeline statistics
There are three time-related statistics displayed above the swimlanes:
- Total Travel Time = the total travel time for all jobs that fall within the time span set by the date picker.
- Total Time Scheduled = the total time for all scheduled jobs that fall within the time span set by the date picker (excludes canceled jobs).
- Average Travel Time = the average travel time for all jobs that fall within the time span set by the date picker.
When the browser window containing the web app is collapsed beyond a specific point (to less than 1440 pixels in width), the timeline labels on the swimlane are hidden and are replaced with icons. The console can collapse to a minimum width of 1280 pixels before scrollbars appear.
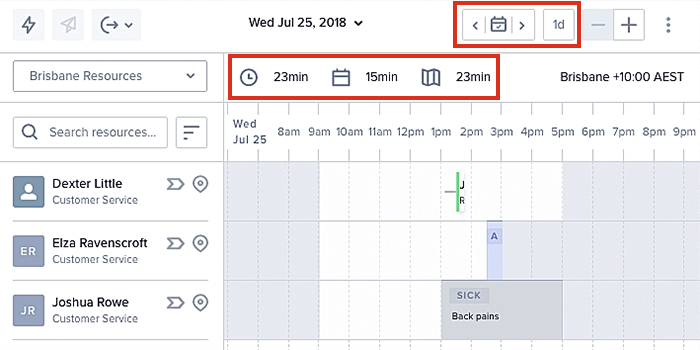
A view of the timeline icons in the scheduling console when the swimlanes have been collapsed.
Feedback
Was this page helpful?