Deprecated: Decline or cancel a job
Important
-
The Skedulo v2 mobile app is being deprecated.
-
Starting 15 April 2025, the Skedulo v2 mobile app will no longer be available for download from app stores.
-
If you’re currently using the Skedulo v2 mobile app, Skedulo will continue to support your transition to the Skedulo Plus mobile app, which offers enhanced experience and new features. For further assistance, please contact your organization’s Skedulo Administrator or your Skedulo Customer Success Manager.
Overview
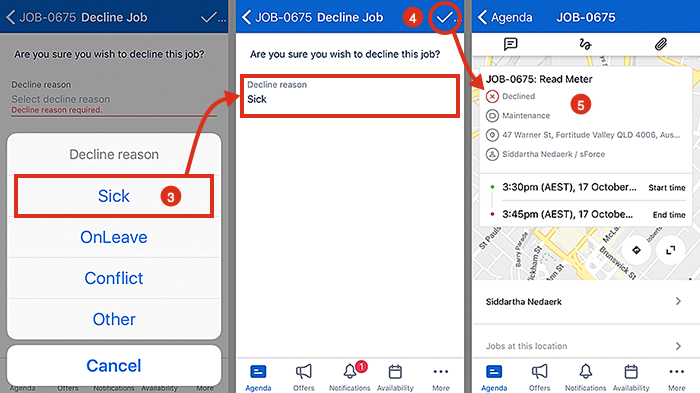
When a new job is received in the Skedulo v2 mobile app, the user has the opportunity to refuse (or decline) the job rather than accept it.
Decline a job
In the job’s details, next to the Accept Job button there is a red Decline Job button. Tapping this button will result in one of two outcomes:
-
If the admin setting When jobs are declined, prompt resources to submit a reason for declining their jobs is enabled, a sliding view will prompt the user to pick a Decline reason from a drop-down menu before they can successfully decline. Tapping the checkmark icon will save the selection and decline the job. The reason chosen will be relayed back to the web app.
-
If the admin setting When jobs are declined, prompt resources to submit a reason for declining their jobs is disabled, a confirmation pops up. Tap Decline reason a second time and the job will be declined straight away–no reason need be given.
Important
If the admin settings for Job Templates has Jobs can be declined disabled, then the Decline Job button will not show in the Skedulo app. The workflow action labels (button labels) can be customized using admin settings. Therefore the button names might not always reflect the defaults shown in this article.Tip
Admins can change, add, or edit the Decline reason list in their Salesforce CRM. In Setup open the object manager and select Job Allocation from the object list. In the Job Allocation object there is a field named Decline Reason, which contains the values that populate the picklist on the mobile app.
Schedulers can reallocate a declined job by going back to the job’s details and selecting Allocate a resource in the normal way. Note, if someone declines a job they are marked as having done so. Skedulo will not recommend again someone who has declined the job, but the scheduler can still remove the declined mark manually and reallocate them if required.
Cancel a job
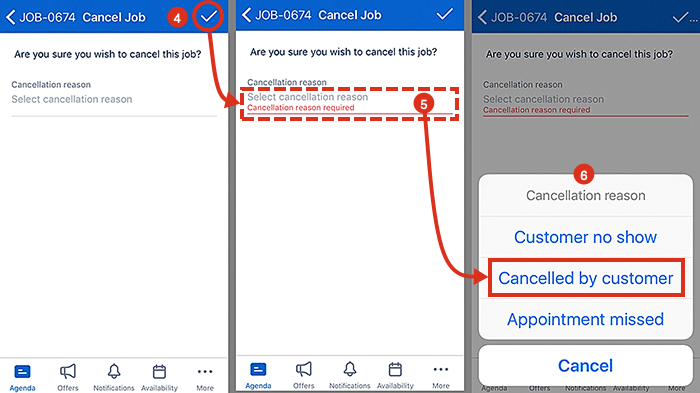
From time to time a user may need to cancel a job which they have been allocated. This option is available to Skedulo app users—however, it is not enabled by default.
To activate this feature, enable the admin setting Allow resources to cancel allocated jobs—this will expose the Cancel Job option in the blue Actions button in the job’s details.
Once permitted, a user can cancel an allocated job that has been accepted—for themselves and all the other assigned resources.
Once accepted, the option to cancel will appear in the Actions button menu. Tapping on Cancel Job presents a sliding view where the user must pick a cancellation reason from a drop-down menu before they can successfully cancel the job. Tapping the checkmark icon will save the selection and cancel the job. The reason chosen will be transmitted back to the web app.
Important
When a job is canceled, the attached resource is still marked as allocated to that job in the web app swimlane–marking them unavailable to receive more work. An additional admin setting can be enabled in the web app–once set will make a resource immediately available to receive new jobs when their previous job is canceled.Tip
Admins can change, add, or edit the Cancellation reason list in their Salesforce CRM. In Setup, open the object manager and selectJob from the object list. In the Job object there is a field named Abort Reason, which contains the values that populate the picklist on the mobile app.
Related links
Feedback
Was this page helpful?