Create recurring schedules
Overview
A recurring schedule allows a scheduler to create work items that occur in a repeating pattern (e.g., every Monday and Wednesday from October through December). These work items can also take place at the same location at the same time of day.
For example, weekly lawn mowing and garden maintenance are scheduled every Monday at the same time.
Note
You can create up to a maximum of 365 work items in a recurring schedule.Prerequisites
Only users with the Administrator or Scheduler role or users with the following permission can create a recurring schedule:
- Scheduling > Modify recurring schedules
Create a new recurring schedule
Steps
To create a recurring schedule for a work item, do the following steps:
- On the Create job page, enter all the job details that are needed, and then switch to the Time tab.
- Enter a valid date, a start time, and an end time.
- Select the Make Job recurring checkbox.
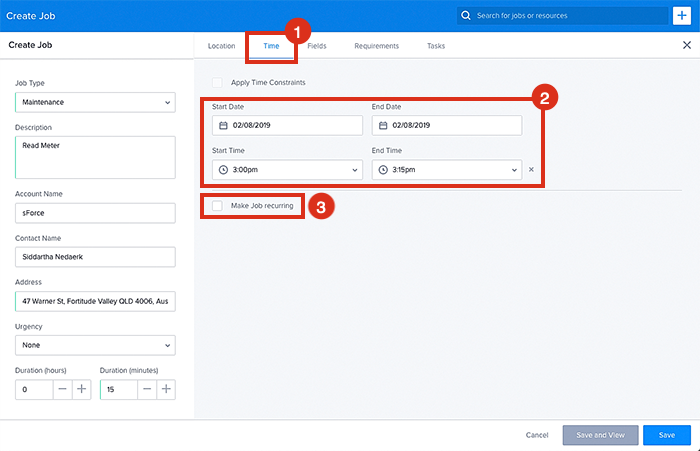
- The Make Job recurring section displays. You can choose either to use a Calendar or Pattern Builder to create a recurring schedule for a work item.
Create a recurring schedule for a work item using the Calendar
The recurring schedule calendar lets the scheduler select the exact days that they want to include in a recurring schedule.
Steps
- Add a date by selecting it, or remove it by clicking on it again.
- Click Save to save your changes.
Tip
Select a date and drag it to highlight multiple consecutive days.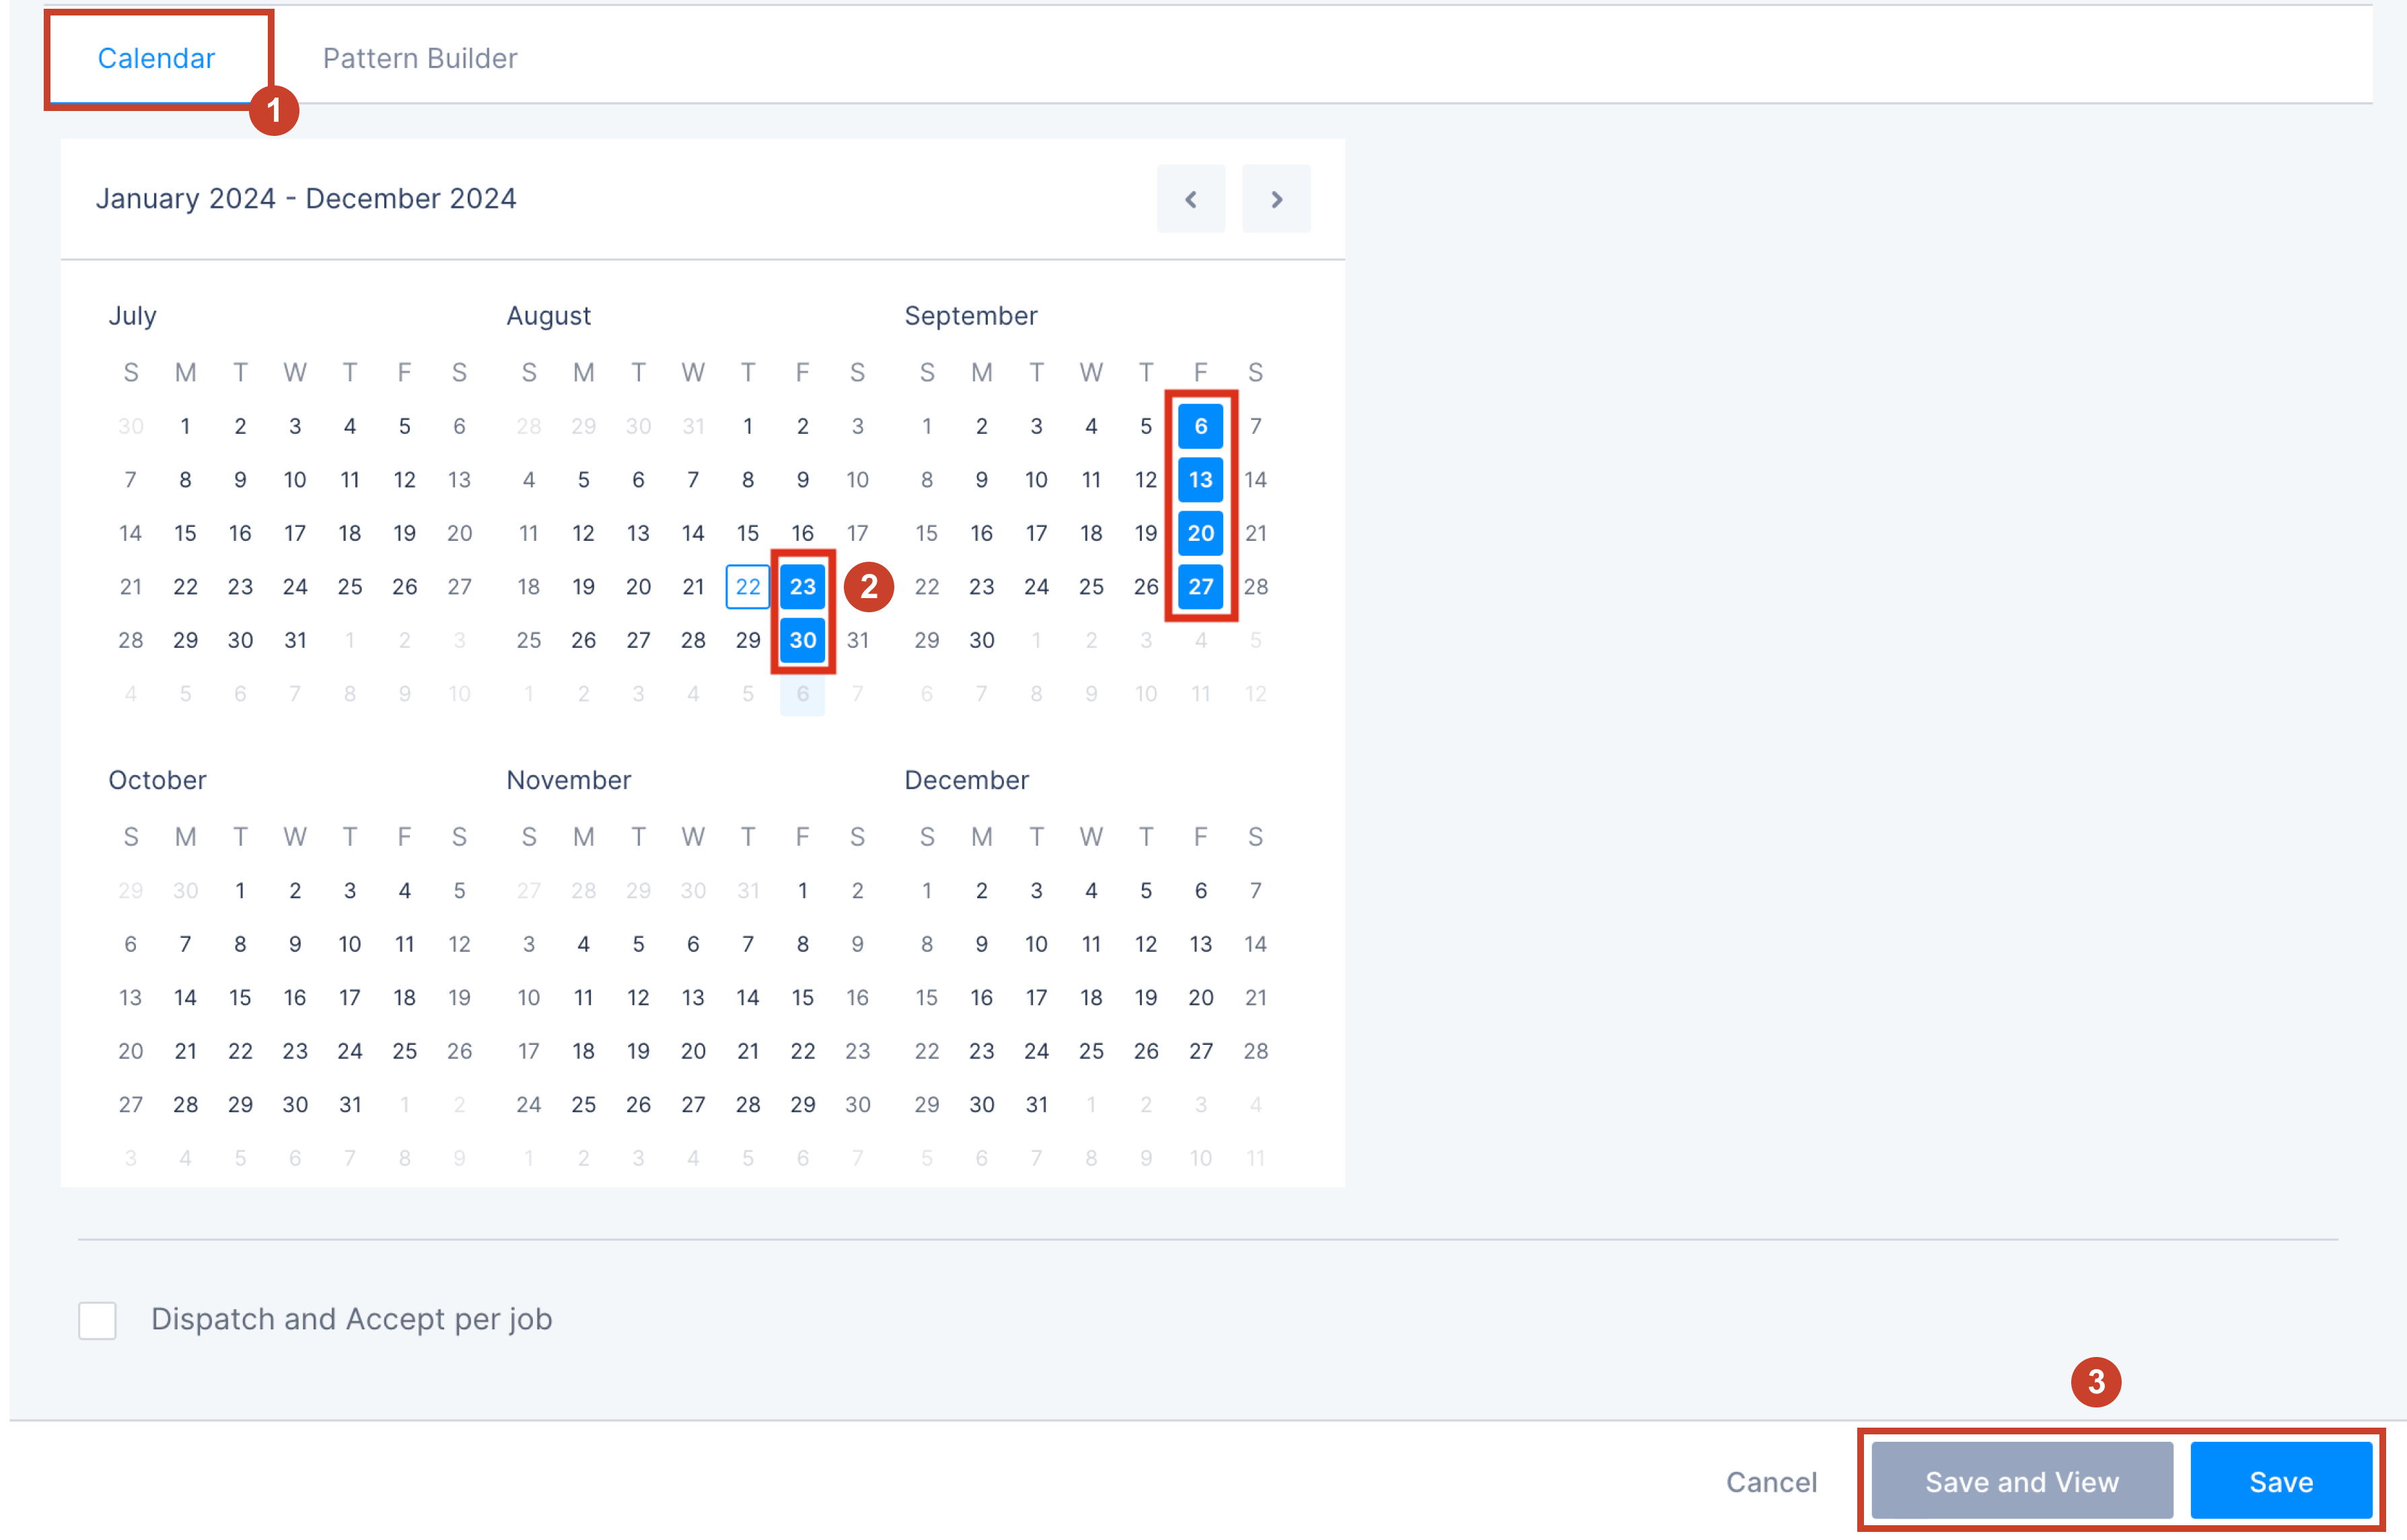
Note
-
By default, the date selected in the Apply Time Constraints date picker is the first date in the recurring schedule calendar. Add more dates to it by picking them from the calendar. Only dates in the future can be picked.
-
The Dispatch and Accept per job checkbox is available–it’s located under the calendar. Refer to Dispatch and Accept per job for more detailed information.
Create a recurring schedule for a work item using the Pattern Builder
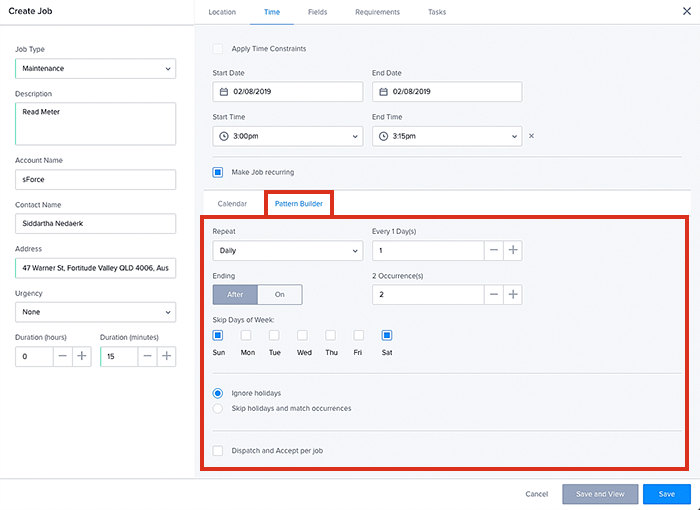
Schedulers can easily build and set up recurring patterns for all work items in a series, defining how they should repeat or follow a specific sequence. You can create recurring schedules on a daily, weekly, monthly, or yearly basis, with the option to select specific days of the week or exclude certain days.
Note
You can create a schedule for up to 365 days in a single operation.Switch to the Pattern Builder tab to set up a recurring schedule for a work item.
Steps
Follow these steps to set up a recurring schedule for a work item using the Pattern Builder.
-
Set how often the schedule repeats.
Select one of the following options:
| Option | Description | Examples |
|---|---|---|
| Daily | Set the number of days to repeat the schedule every ’n’ days. | Every 2 days. |
| Weekly | Set the repetition frequency and then select the days of the week for occurrences in the On checkbox field. |
|
| Monthly on Nth day | Set the repetition frequency and then select the specific date of the month for occurrences in the Repeat on the… field. |
|
| Yearly | Set the number of years to repeat the schedule every ’n’ years. | Every 2 years. |
-
Set whether the repeat ends after a specified number of occurrences, or on a specific date.
a. Click After and enter the desired number of occurrences.
The number of occurrences refers to how many times the work repeats, this may not match the number of weeks or months. This is because the pattern can be configured to skip certain days, such as public holidays. For example, if a work is set to occur every Wednesday for 12 occurrences and one of those Wednesdays is a public holiday, the system will skip that day. As a result, to complete 12 occurrences, the schedule will extend over 13 weeks.
b. Click On and select a specific end date from the calendar.
-
(Optional) Choose skip days of the week.
-
Specify whether to skip holidays or not.
There are three options for how to deal with occurrences that coincide with holidays. The options are:
| Option | Condition | Description |
|---|---|---|
| Ignore holidays | Default option | The system will create work on all days according to the pattern, even if they coincide with holidays. |
| Skip holidays and match occurrences | Ending is set to After | The system will not create work on days that coincide with holidays. The number of occurrences is the number of weeks that the pattern occurs, and may not equate to the number of jobs if a holiday occurs during the period that the pattern is active. |
| Skip holidays and match end date | Ending is set to On | The system will not create work on occurrences that coincide with holidays. |
-
(Optional) Select Dispatch and Accept per job.
Refer to Dispatch and Accept per job for more detailed information.
-
Click Save or Save and view.
Example
In this example, we’ll create a pattern that recurs every month, on a specific day for 12 months.
- Select Monthly on the Nth Day from the repeat dropdown list.
- To make the occurrence fall on the second day of each month, select 2 from the Repeat on the dropdown list.
- Set the number of occurrences to 12 to repeat the job for 12 months.
- Clear the Skip days of the week checkboxes to make sure a job is created, even if it falls on a weekend.
- Choose to ignore holidays.
- When you have finished entering all of the job details, click Save.
- (Optional) Select the option Dispatch and Accept per job if you require the resource to acknowledge each job individually.
Skedulo will create work items to match the recurrence pattern you have defined.
Create a recurring schedule from an existing job
Important
This option is inactive for the following types of work items:
- Work items that are already on a recurring schedule.
- Canceled work items.
- Locked work items.
Steps
To use an existing work as a template for a recurring schedule, do as follows:
-
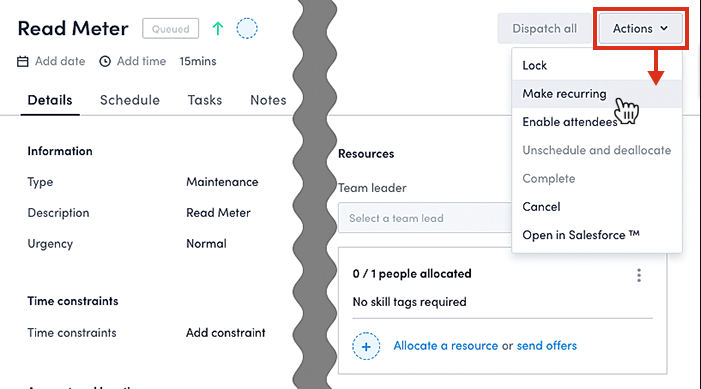
Go to the work details page of a work item that you want to use as a template.
-
In the work details page, select Actions > Make recurring to open the Create Recurring Pattern modal.
-
In the Create Recurring Pattern modal, choose a start date, and a start time. Then use the Calendar or Pattern Builder to configure the schedule.
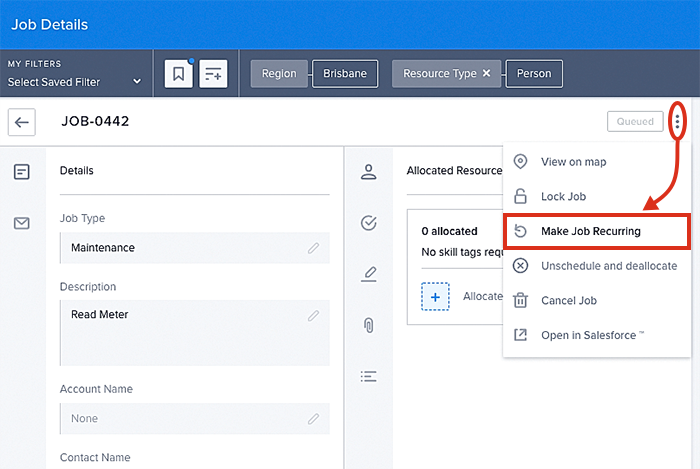
-
Click Save to confirm.
Once saved, the recurring schedule view will open, presenting you with all work items in the series.
Note
You can create a recurring schedule for work that contains multiple resource requirements. However, once the schedule is set, any changes to resource requirements only affect the specific work being modified, while the other work in the schedule will remain unchanged.Dispatch and accept individual work items
By default, work items in a recurring schedule are dispatched as a group. If an allocated resource accepts one work item in the series, they automatically take all other work items in that series as well. However, if resources are required to acknowledge each work item individually, then there is a setting to be configured.
This setting can be applied to each schedule by enabling the option Dispatch and Accept per job found at the bottom of the Create Job page’s time tab.
This setting can also be set at a global level–applying to all recurring schedules across the organization. To set the global setting, do as follows:
Steps
-
Click on your user profile in the upper-right corner, then go to Settings > Scheduling > Jobs.
The Jobs setting page displays.
-
Scroll down to the Recurring Schedules section, then enable the Dispatch and accept per job option.
Conflicts in a recurring schedule
When you change any parameter of a work item that is part of a recurring schedule, you may encounter some work item, resource, or time-related conflicts after passing through a series of availability validations. Such conflicts may result in your desired change no longer being a viable option.
If there are any conflicts in the schedule, Skedulo detects them and notifies/warns the scheduler. The scheduler can decide whether to continue with the allocation of the resource for the job or not after careful consideration.
Example
Let’s create a recurring schedule that has 2 work items. Now, let’s add two resources to the first of the two jobs.
At this point, the following notification appears:
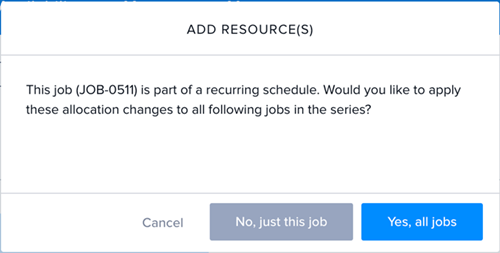
Here, you can:
- Select Cancel to cancel the allocation of the added resources.
- Select No, just this job to allocate the added resources to just the first job of the schedule.
- Select Yes, all jobs to allocate the added resources to all the jobs of the schedule.
If you select Yes, all jobs, Skedulo commences checking each resource’s availability to perform the next job in the schedule. If on that particular day, the resource is unavailable, this can create conflicts. The Job conflicts modal pops up to inform you.
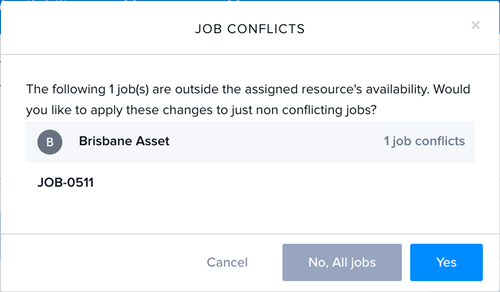
As a scheduler, you can inspect the conflicts by clicking on the resource’s name. After making careful considerations, you can:
- Select Yes to allocate only the non-conflicting jobs to the nominated resource.
- Select No, All jobs to allocate the job to the nominated resources irrespective of the conflicts.
- Select Cancel to revert your changes.
Note
- The changes to the first job in the schedule will be applied irrespective of having conflicts or not. Only future jobs (subsequent jobs) will be checked for availability.
- The scheduler can always ignore the conflict warning and go ahead and allocate the job as it is only a notification.
- While using the bulk resource allocation feature, the job allocation does not perform availability checks or respect resource availability. Instead, it will simply allocate the jobs as instructed.
- Please note that this Cancel option is not fully supported in the old job details view. You can choose to continue using the new job details view or switch back to the old view by using the Disable new job details page in the web app (browser refresh required) checkbox under Settings > Beta features.
Related links
Feedback
Was this page helpful?