Install and view Skedulo reports and dashboards
Overview
Skedulo Reports and Dashboards is now available for free on the Salesforce App Exchange to Skedulo customers. It gives administrators and managers pre-built reports and dashboards that make data management and analysis easier than ever.
Tracking data by jobs, accounts, resources, and regions, makes it dramatically simpler for managers to understand the direction their business is moving and where to invest resources for the best possible returns.
Link to the Salesforce App Exchange
Skedulo Reports and Dashboards
Package content
Included in the package are the following reports and dashboards:
-
Active Resources in Regions by Category.
-
Average Travel Time by Region.
-
Current Quarter Resource Job Leaderboard.
-
Current Year Average Travel Time by Resource.
-
Current Year Job Growth by Month.
-
Current Year Job Hours by Account.
-
Current Year Job Hours by Region.
-
Current Year Resources by Created Date and Region.
-
Current Year Travel Time by Month.
-
Jobs by Account Industry.
-
Job by Type and Resource.
Installation instructions
Before installing Skedulo Reports and Dashboards, you must ensure that reporting is enabled for the following managed package objects:
-
Resource
-
Region
-
Job
-
Job Allocation
-
Job Tag
To enable reporting on these objects:
- Click the Setup icon and select Setup from the pop-up menu.
- Select the Object Manager tab.
- Click an object label to open its Details page.
- Click Edit to display the Edit Custom Object page.
- Under Optional Features, select Allow Reports.
- Click Save.
Once reporting has been enabled on the required objects:
-
Go to the Salesforce App Exchange.
-
Log into your Salesforce org (using your admin credentials).
-
Click Get It Now.
-
Direct the installation to your preferred environment (i.e., production or sandbox).
-
Read through the package details and if all looks good check the box next to “I have read and agree to the terms and conditions.”
-
Click Confirm and Install. You will be prompted to log back into your Salesforce org.
-
On the Skedulo package installation screen, decide which users will have access to the new functionality (the default is Install for All Users). Click Install once you have made your choice.
-
If the package installs successfully, you’ll see an Installation Complete message and may receive an email notification In this case, you will need to go back, set the access, then rerun the package install.
View dashboards in Salesforce
To view the final product, perform the following:
-
Using Salesforce Lightning, select the App Launcher and locate Dashboards (or search for Dashboards). A new tabbed window will display.
-
Select Skedulo Dashboard from All Dashboards in the left column.
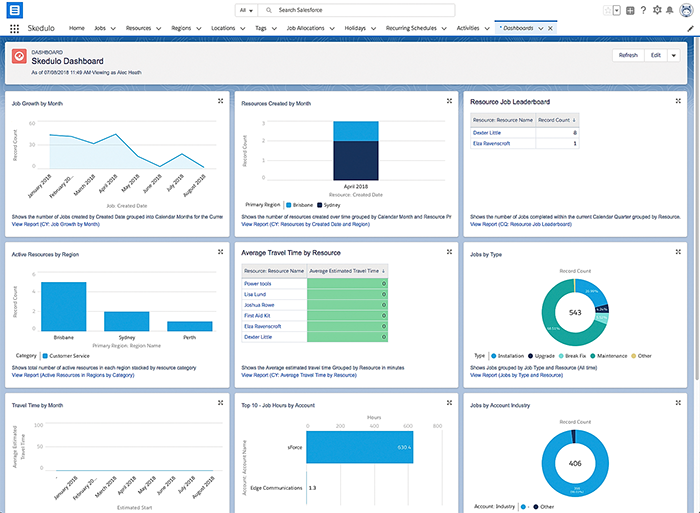
An example of the Skedulo dashboard and reports.
Feedback
Was this page helpful?