Deprecated: Create a follow-up job
Important
-
The Skedulo v2 mobile app is being deprecated.
-
Starting 15 April 2025, the Skedulo v2 mobile app will no longer be available for download from app stores.
-
If you’re currently using the Skedulo v2 mobile app, Skedulo will continue to support your transition to the Skedulo Plus mobile app, which offers enhanced experience and new features. For further assistance, please contact your organization’s Skedulo Administrator or your Skedulo Customer Success Manager.
Overview
In Skedulo, if there is not enough time allocated to complete a job, it is possible for the mobile user to book a follow-up visit.
Important
For this type of self-assignment to work, the mobile user (or resource) must have job allocation permissions granted on the CRM. If they do not, the follow-up job will still be created; however, it will not be allocated to anyone—the scheduler will have to do that part.
With CRM permissions granted, if “Assign to myself” is used, and a date and time are included, a pre-confirmed entry will appear in the mobile user’s calendar for the follow-up job.
The “Follow-up” job feature can be disabled via the admin settings (applies to Skedulo users connected to the new Skedulo web app only).
The “Assign to myself” option can be disabled via the admin settings (applies to Skedulo users connected to the new Skedulo web app only).
Create a follow-up job
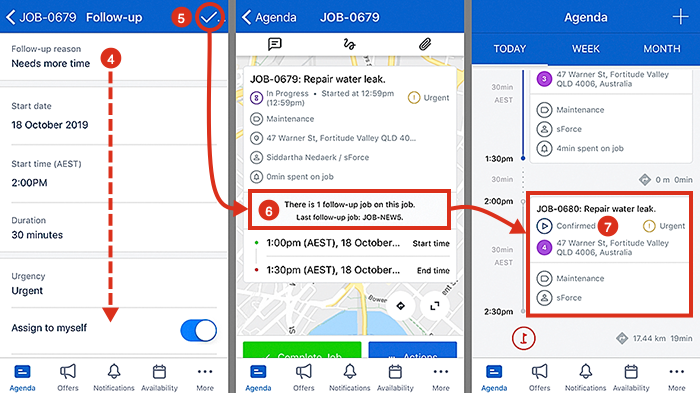
To create a follow-up visit (or job) perform the following actions:
-
Before completing the original job, tap on Actions and select Follow-up from the pop-up menu.
-
In the follow-up view, tap on Follow-up reason and pick a reason from the list.
-
Pick the date and time for the next visit (optional).
-
Enter the time required for the follow-up call (duration).
-
Set an urgency flag (if required).
-
Use the switch named Assign to myself –if applicable, and more importantly, if available (see the note at the bottom of the page).
-
Save the follow-up job by tapping on the large check (tick) button at the top-right of the view. A new notification will appear in the job’s details indicating a follow-up job has been created. It will also show the new job number.
Any job notes saved in the original job will be copied to the new follow-up job.
The original job can now be completed by tapping the Complete Job button.
If the follow-up job is not assigned (i.e., to myself), it will be queued in the web app ready to be allocated by the scheduler.

Create a follow-up job with custom fields
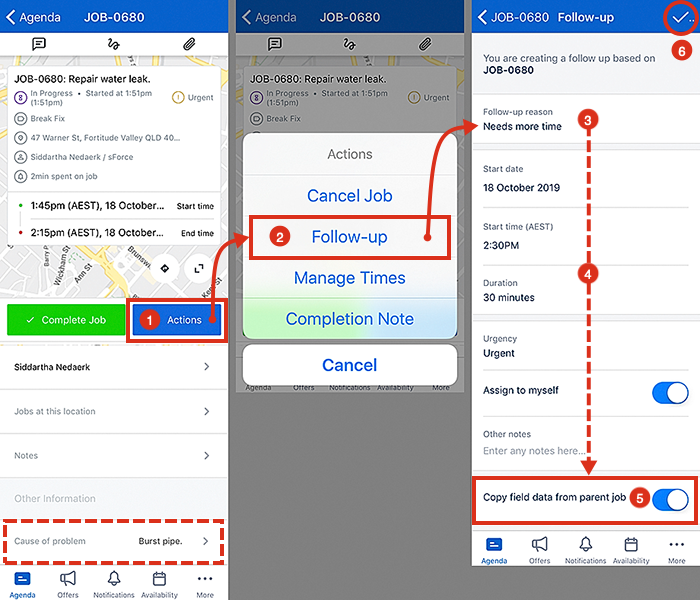
To create a follow-up visit (or job) that contains custom fields from the previous or parent job, perform the following actions:
-
Before completing the original job (the job must be In Progress), tap the Actions button and select Follow-up from the pop-up menu.
-
In the follow-up view, tap on Follow-up reason and pick a reason from the list.
-
Pick the date and time for the next visit (optional).
-
Enter the time required for the follow-up call (duration).
-
Set an urgency flag (if required).
-
Use the switch named Assign to myself –if applicable, and more importantly, if available (configurable using admin settings).
-
Use the switch named Copy field data from parent job –this will copy over the custom fields from the previous or parent job (this switch is enabled by default).
-
Save the follow-up job by tapping on the large check (tick) button at the top-right of the screen.
-
A new notification will appear in the job’s details indicating a follow-up job has been created. It will also show the new job number.
Related links
Feedback
Was this page helpful?