Create and manage data objects on the Skedulo Pulse Platform
Overview
From the Objects and fields admin settings, you can create your own objects or add fields to standard or custom objects. You can then map your custom fields to objects in the data model and also choose when and where they are visible to schedulers and mobile users.
Important
-
There are different methods for creating custom objects and fields for the Skedulo Pulse Platform and Skedulo for Salesforce.
-
This page contains information on how to add, edit, and delete objects and fields on the Skedulo Pulse Platform. For detailed information, see Create custom objects in the Skedulo Pulse Platform.
-
For Skedulo on Salesforce, see Create custom objects in Salesforce.
Skedulo comes with a number of standard data objects, which make up the data schema of your team. New objects and fields can be added to the system so that your solution is customized according to your organization’s business processes and requirements.
Objects
View object details
To view an object’s details, do the following:
- Navigate to Settings > Data management > Objects & fields.
- Click the name of the object you want to view. Alternatively, click the vertical ellipse icon
 at the end of the object’s row and then click Edit. The object details page displays.
From this page you can do the following actions:
| Object type | Action | Procedure |
|---|---|---|
| Custom objects | Edit object details | Click Edit object details to update the object’s label and description. |
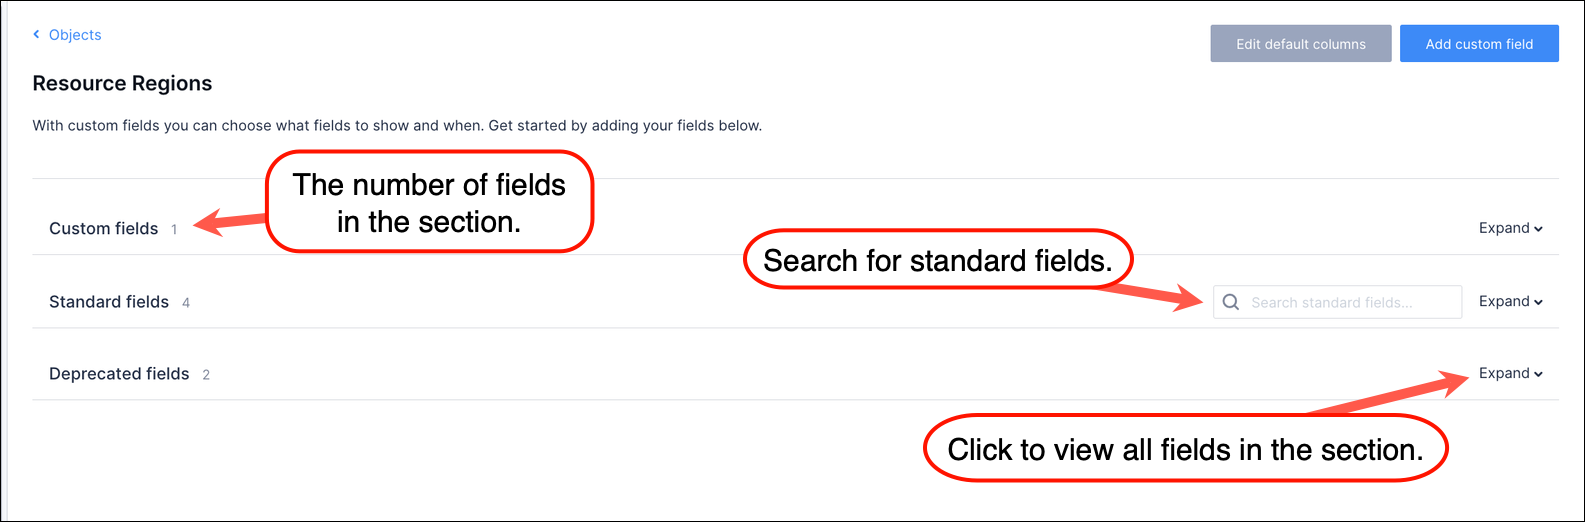
| Standard objects | View standard fields | Click Expand to the right of the Standard fields section heading. |
| Search for standard fields | Enter a search term into the search box to the right of the Standard fields section heading. | |
| Standard and custom objects | View custom fields | Click Expand to the right of the Custom fields section heading. |
| View deprecated fields | Click Expand to the right of the Deprecated fields section heading. | |
| Edit default columns | Click Edit default columns to customize the order and appearance of columns in the object’s default view. | |
| Add custom fields | Click Add custom field to add your own field to a standard or custom object. | |
| Rearrange custom fields | Drag and drop fields to change their order. | |
| Delete custom fields | Click the bin icon to delete a field. | |
| Edit custom fields | Click on a field value to launch the Edit field wizard. |
Create a custom object
By creating a new object, you are adding a table to the database. The fields that you add to the object are the table columns. For detailed information on how to create custom objects in the web app or through the API, please see the developer docs. Brief instructions are included here.
To create a data object, do the following steps:
- From the Objects & fields settings page, click Create custom object.
- Enter a label, a name, and a description for the object. The object name must be unique.
- Click Create, or to return without creating an object, click Cancel.
Edit default columns on an object
You can configure which columns show up in the default view of the object, and in what order they appear. It is also possible to customize the column headings and specify what should appear when there is no data.
To learn more about how to do this, please see the advanced configuration documentation.
Fields
You can add different field types to an object, depending on your needs:
- Text
- Text area
- Decimal
- Integer
- Date
- Time
- Date & time
- Checkbox
- Picklist
- Multi-picklist
- URL
- Lookup
- Has many (can only be added when there is an existing lookup)
Add custom fields to objects
To add a custom field to a standard or custom object, do the following:
- From the object details page, click Add custom field.
- Click to select the field type you want to add.
- Click Next.
- Fill all mandatory fields and optional fields as needed.
- Select display settings. See the table that follows for more information about these settings.
- To proceed with adding the field, click Create. To return to the previous page of the wizard, click Prev, or to leave the wizard without creating a field, click Cancel.
Display setting options
| Setting | Description |
|---|---|
| Show on Desktop | Field will display on the web app. |
| Show on Mobile | Field will display on the mobile app. |
| Editable on Mobile | Field value will be editable on the mobile app. |
| Required on Mobile | Field will be required to be completed on the mobile app. |
Generic field settings
All fields can have the following configured:
| Field | Description | |
|---|---|---|
| Object | Predetermined by the object to which you are adding the field. | |
| Field label (mandatory) | The field label to be shown in the user interface. | |
| Field name (mandatory) | The field name in the data table. This field is limited to 61 characters. For custom field types picklist and multi-picklist, the first portion of the field must be unique. The number of characters that the unique validation applies to depends on the length of the object name that the field is being added to, where (number of unique characters) = 57 - (length of object field name). | |
| Description | An optional field for explaining the purpose of or other details about the field. It does not appear on the user interface. | |
| Display settings | Options for where the field should appear (on desktop or mobile), whether resources can edit the field in the mobile app, and whether it is mandatory for resources to fill the field. |
Field-specific settings
Different field types have specific fields to configure in addition to the generic fields described above.
| Custom field type | Additional type-specific fields |
|---|---|
| Text | Field length (max 255) |
| Text area (long) | Field length (max 131 072) |
| Decimal | Field length (default 8) and Field decimal places (default 2) |
| Integer | n/a |
| Date | n/a |
| Time | n/a |
| Date & time | n/a |
| Checkbox | Option to show the checkbox by default |
| Picklist | Picklist values |
| Multi-picklist | Picklist values |
| URL | n/a |
| Lookup | Target object |
| Has many | Object that has a lookup relationship |
Related links
-
For more information about Lookup and Has many field types, see Understand the Lookup and Has many custom field types.
-
For detailed instructions and best practices for creating custom objects and fields on the Skedulo Pulse Platform, see Create custom objects and fields.
-
For information about creating custom object for Skedulo for Salesforce, see Create custom objects in Salesforce.
Feedback
Was this page helpful?