Customize the swimlane views
Note
The Pulse Scheduling Experience is only available on the Skedulo Pulse Platform.Overview
Saved views in the swimlane allow you to have multiple different swimlane configurations that you can easily change between and share with other users in your organization. See the Pulse scheduling experience swimlane documentation and saved view documentation for more information.
Note
Some of the functionality described in this documentation requires that users have specific permissions for managing work and resource records.Manage swimlane views
Add a new view to the swimlane
New saved views for the swimlane can be added by creating a new one scratch with the default settings applied, or by duplicating an existing view that already has some customization.
To add a new swimlane view from scratch, do the following steps:
- Click the menu icon
 to the left of the swimlane’s heading and then click Create new schedule view.
 - Enter a name for the view.
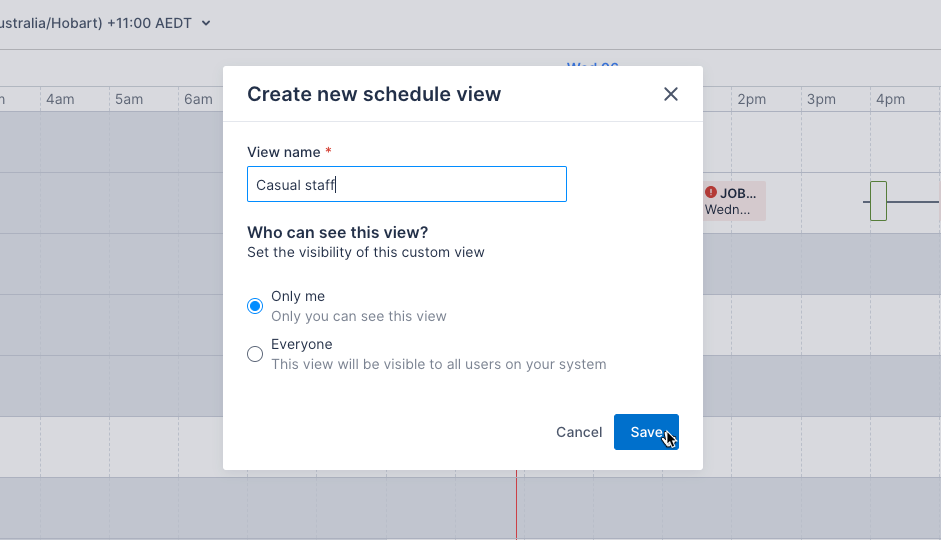
- Select the level of visibility for the view. These can be changed later, if required.
- Click Save. The view is created and applied to the swimlane (the swimlane heading updates).
The view can then be customized by doing the following steps:
- Make changes using the sort, filter, view period, and timezone functionality and then click Save view changes (next to the swimlane heading).
- Make changes to the swimlane settings using the instructions below.
Duplicate a saved view in the swimlane
- In the swimlane, click the menu icon to the left of the swimlane’s heading and then click the vertical ellipse icon
 next to the view you would like to duplicate.
 - Click Duplicate view.
- The view is duplicated and the new view is applied to the swimlane.
The view can then be customized by doing the following steps:
- Make changes using the sort, filter, view period, and timezone functionality and then click Save view changes (next to the swimlane heading).
- Make changes to the swimlane settings using the instructions below.
Delete a saved view in the swimlane
- In the swimlane, click the menu icon to the left of the swimlane’s heading and then click the vertical ellipse icon next to the view you would like to delete.
- Click Delete view.
- Click Delete to confirm the action and return to the default view of the swimlane, or click Cancel to return to the swimlane without deleting the view. Note that deletion is not reversible.
For more information about using saved views, see the list view documentation.
Update the swimlane settings
Swimlane settings are saved as part of the view. You can configure a view you are currently using or make changes to another view. Note that you cannot make changes to the default view.
The swimlane view settings enable you to customize the following elements of how the swimlane displays:
| Setting | Description |
|---|---|
| View name | Change the name of the saved view. |
| View visibility | Change the level of access for the saved view so that only you can see it or it is available to other users. |
| Swimlane options: Show days | Hide the days on which you don’t schedule work. |
| Swimlane options: Show hours | Hide the hours on which you don’t schedule work. |
| Timeline control: Set time-snap unit | Control the granularity at which work items snap to a time when dragging and dropping them. |
| Display options: Show travel time | If your team has travel time configured to show in the swimlane, you can use this setting to show or hide them for each view. |
| Resource display: Show avatar | Show resource images (if added to their linked user account) instead of their initials in the left-hand column of the swimlane. |
| Resource display: Show content | Choose up to three fields to display below the resource’s full name in the left-and column of the swimlane. |
Change settings for a view in current use
To make changes to the swimlane settings for your view, do the following steps:
- Click the settings icon
 to the right of the swimlane’s heading. The settings for your saved view displays. Note that the settings icon is only available on saved views and not when the default view is applied.
 - Make changes as required (detailed steps for different configuration options are provided below), and then click Save. The swimlane updates with your changes.
Change settings for a saved view
- In the swimlane, click the menu icon to the left of the swimlane’s heading and then click the vertical ellipse icon next to the view you would like to configure.
- Make changes as required (detailed steps for different configuration options are provided below), and then click Save. The swimlane updates with your changes.
Change a saved view’s name or visibility in the swimlane
To make changes to a view’s name or visibility, do the following steps:
- Open the settings for the view you want to change.
- Update the View name field, if required.
- Under Who can see this view?, do one of the following:
- Click Only me to make the view private and visible only to you, the current user. The view will only appear in the All views and Private views tabs when you change views, and will not be visible to other users in the team.
- Click Everyone to make the view available to all users in the team. The view will appear under the All views and Shared views tabs when other users change the view.
- Click Save to apply your changes or Cancel to return to the swimlane without saving your changes.
Display specific days of the week in the swimlane
If your organization only schedules work during the work week, or only over weekends, you may wish to only display the days that work is scheduled on. Note that these settings work together with the date picker when viewing work with a one-day window. The date picker will take preference such that the selected date will show even if the day of the week is configured to be hidden.
- In the swimlane settings, under Swimlane options > Show days, select the days you want to display. All days are selected by default. If no days are selected, then the swimlane will display all days.
- Click Save.
Reduce the number of hours displayed on the swimlane
You can customize your schedule view further by selecting the hours to show. This is useful if work is only scheduled to occur during certain hours, or if, for example, you need a saved view to display after-hours only or other shift-specific hours. This functionality applies to all view window options (day, 3-day, and week).
To specify the hours that display in the swimlane, do the following steps:
- In the swimlane settings, under Swimlane options > Show hours, click the Only show business hours checkbox. The time picker becomes active.
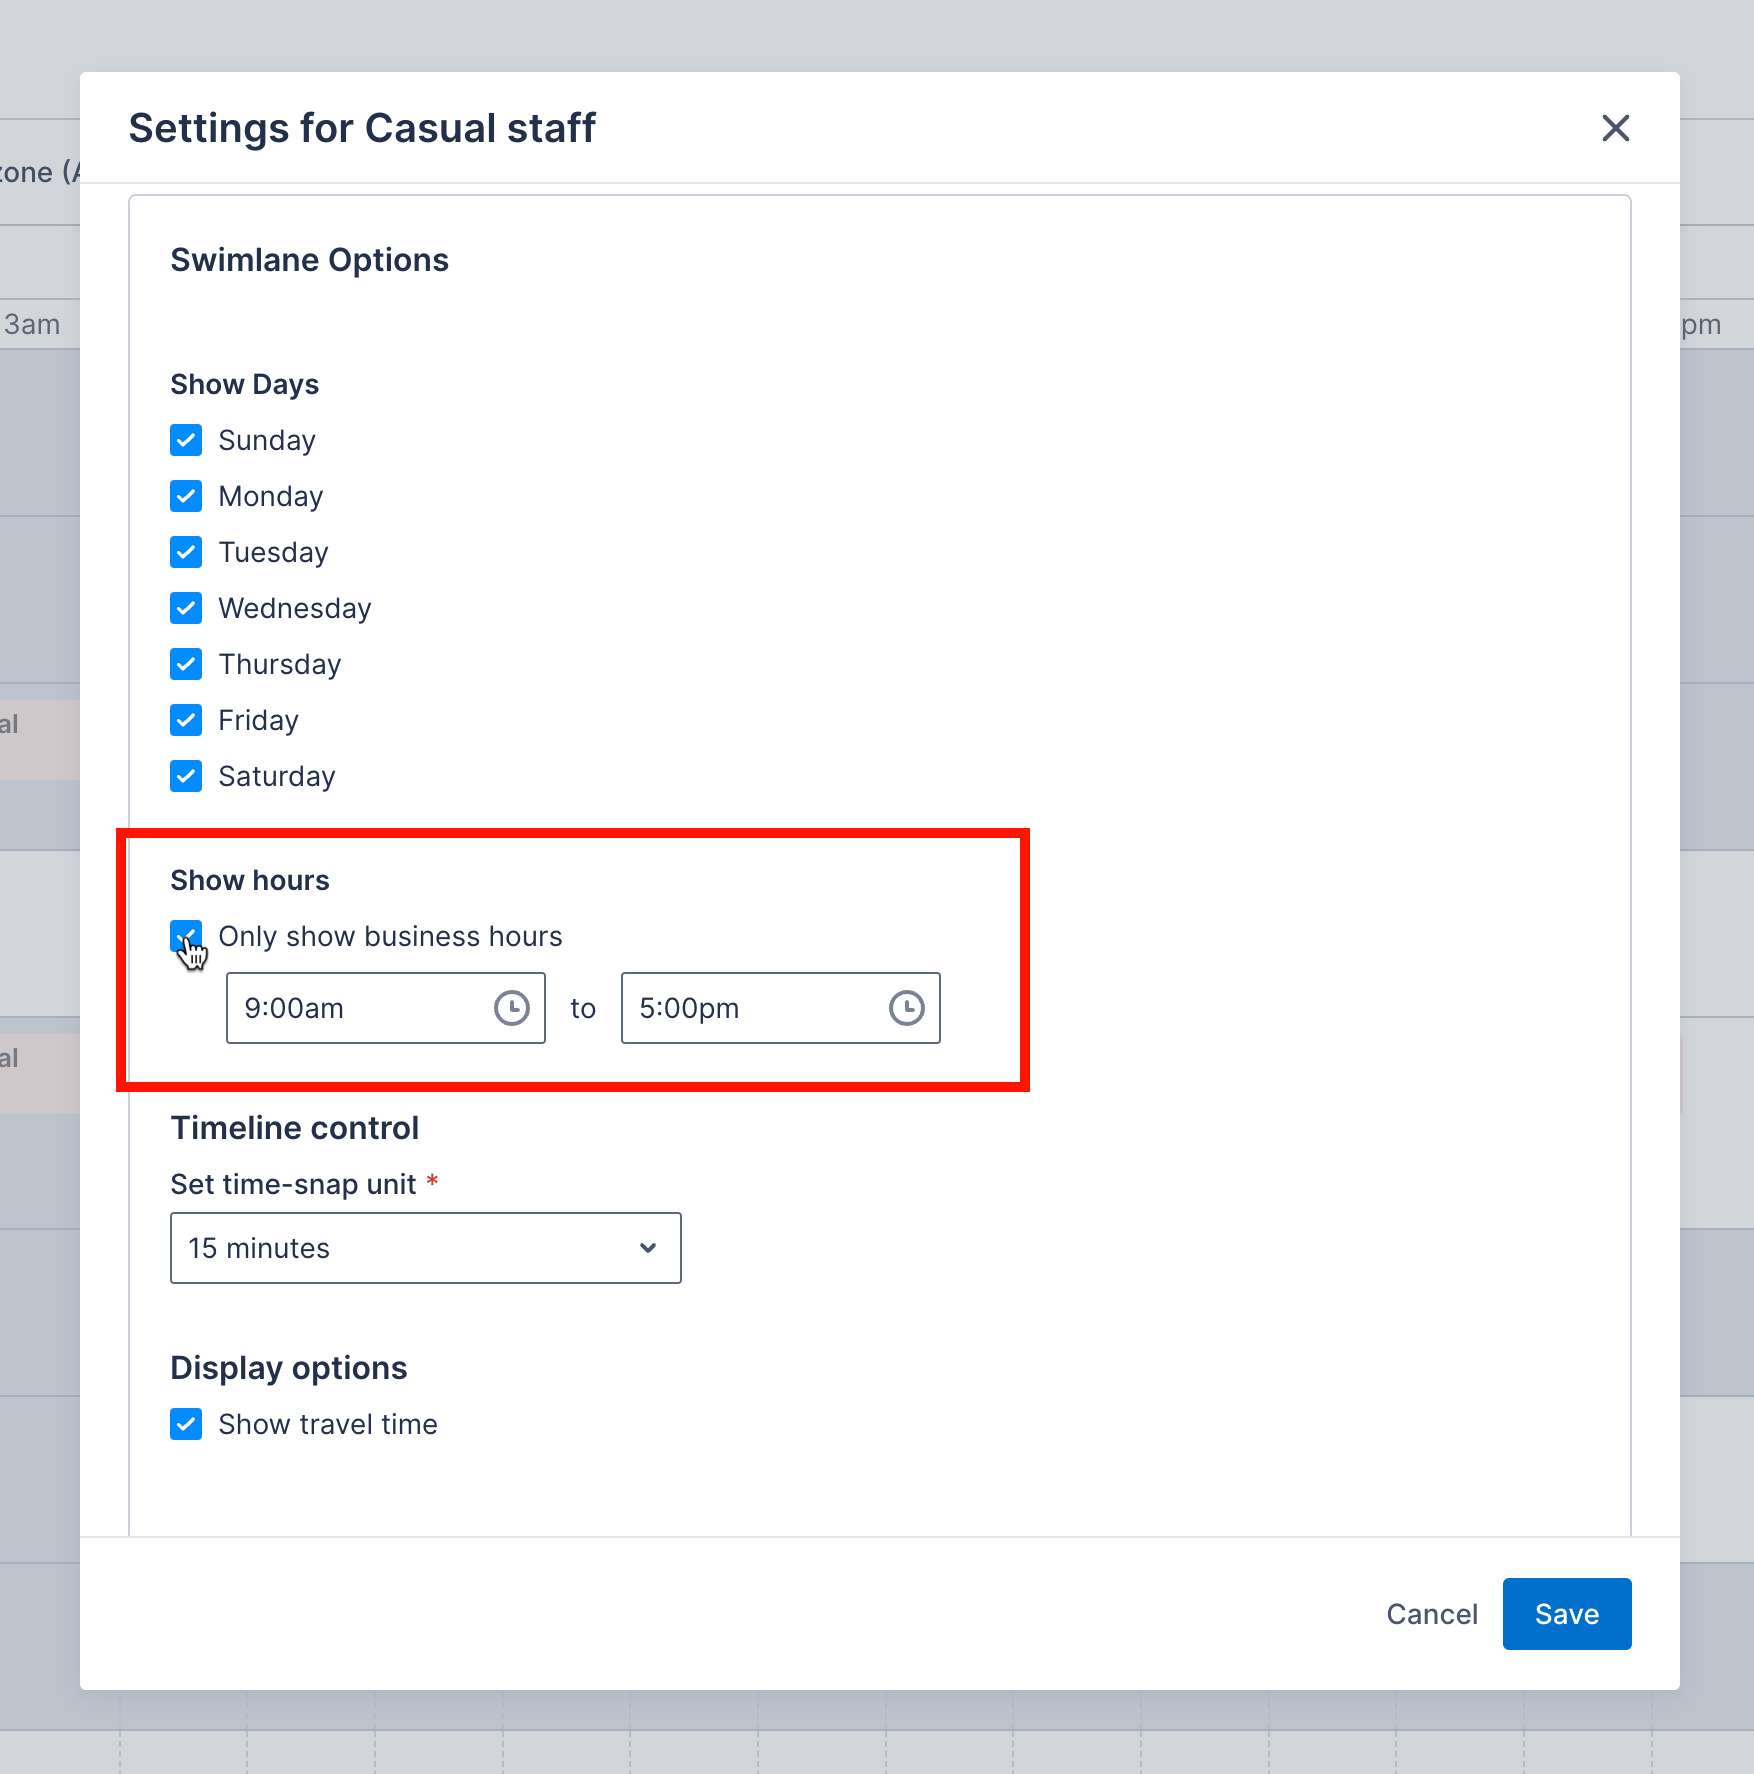
- Click the time picker and adjust the times as needed.
- Click Save. The swimlane updates to show only the hours you selected.
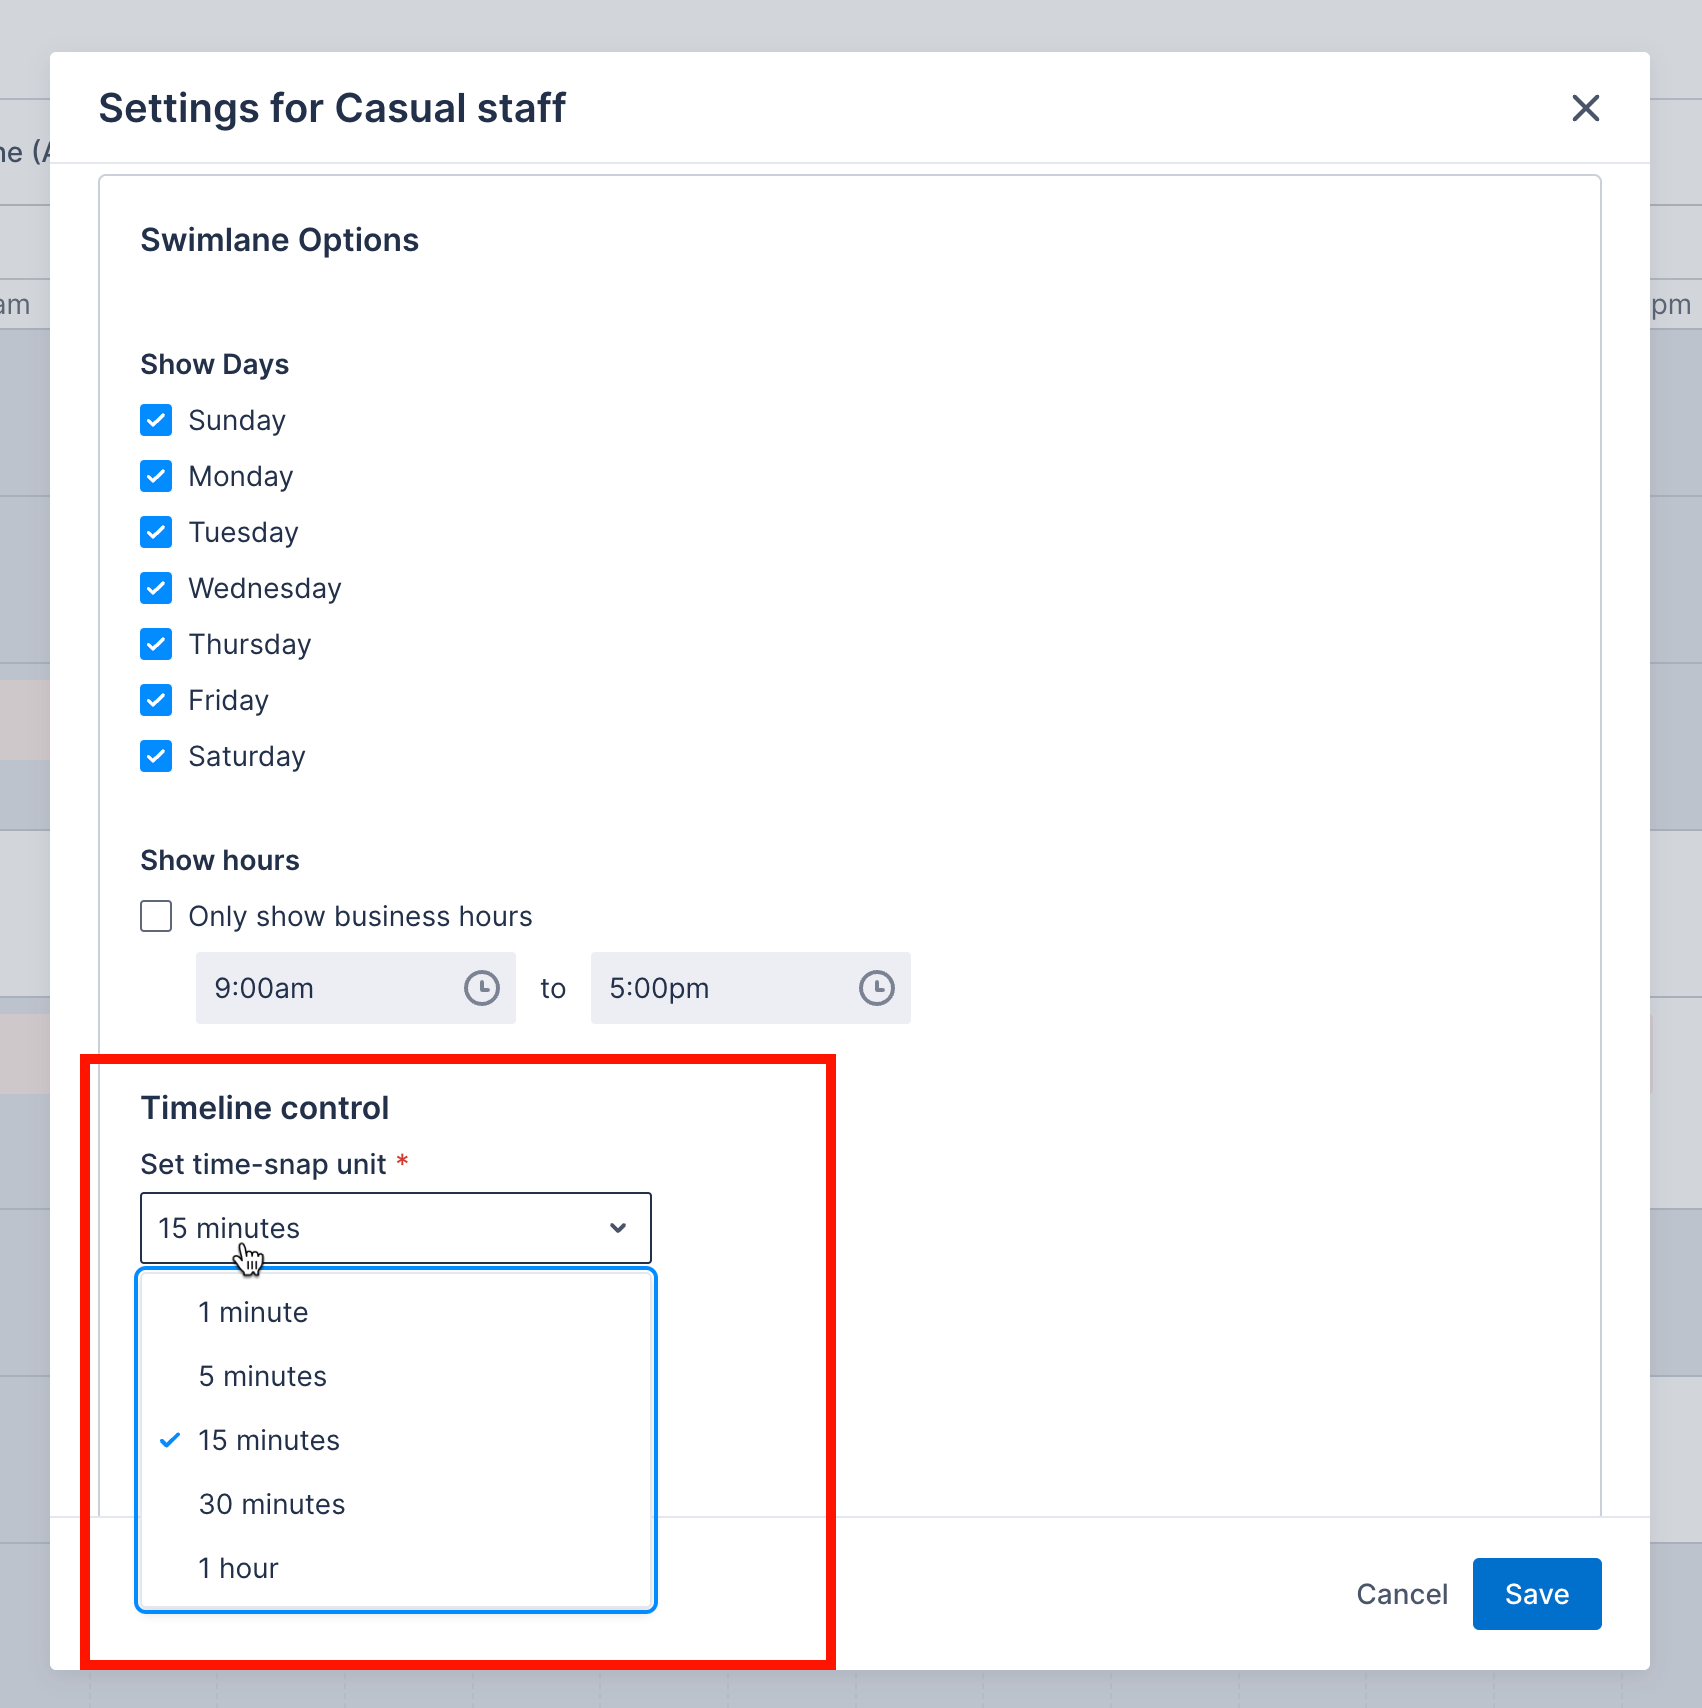
Change the time-snap unit
The unit of time that work cards “snap” to when dragging and dropping items on the swimlane can be adjusted to best suit the time scale that you work at.
Note
You may need to scroll down to view these settings.To alter the time-snap unit, do the following steps:
- In the swimlane settings, under Swimlane options > Display options, click the Set time-snap unit drop-down.
- Select the preferred unit and then click Save.
Show or hide travel times in the swimlane
This option will only be available if your team is configured to show the travel times.
Travel time is displayed as lines, or whiskers, on the work cards in the swimlane. If the team is configured to show it, then travel times are shown by default, but can be hidden if preferred.
To toggle the display of the travel time lines on or off, do the following steps:
- In the swimlane settings, under Swimlane options > Display options, deselect the Show travel time checkbox to hide travel times. Alternatively, select the checkbox to show travel times.
- Click Save.
Customize how the resources display in the swimlane
Resources appear on the x-axis of the swimlane such that each row shows the schedule for that resource. The information that is displayed in their row can be customized depending on the amount and type of information you would like to see without needing to click into and view the resource’s details.
Note
You may need to scroll down to view these settings.The resource’s full name is displayed by default. You can make any of the following changes:
- Display the resources’ avatars, if one has been uploaded on the linked user record.
- Add up to three additional fields to display below the resources’ full names.
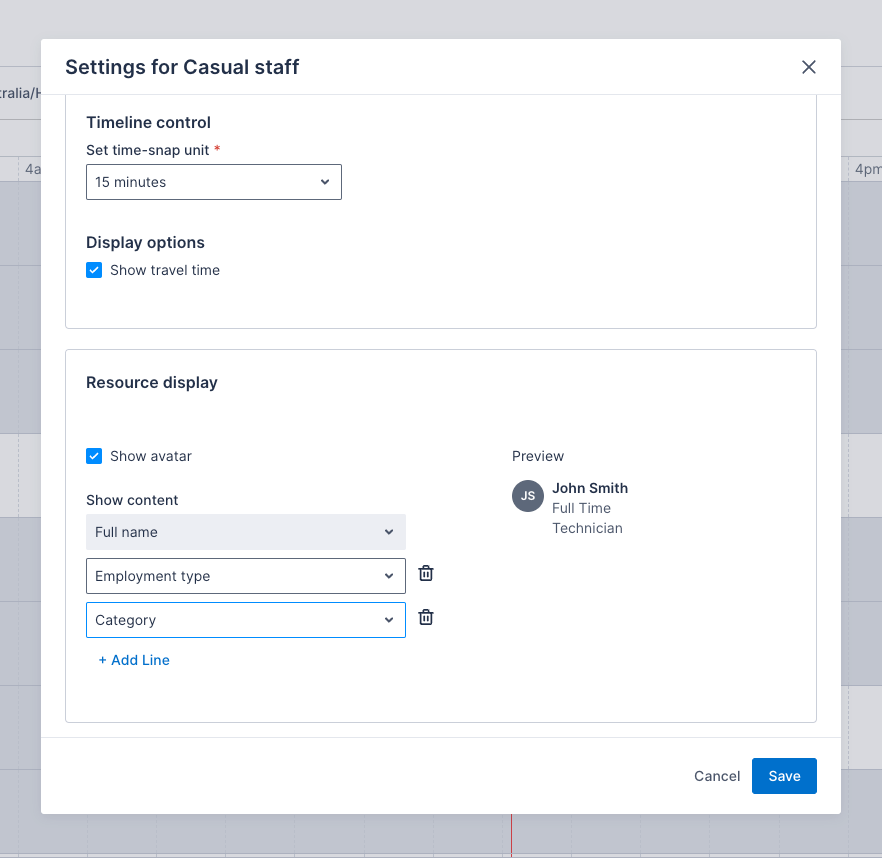
To make changes to the information that displays for the resource in the swimlane, do the following steps:
- In the swimlane settings, under Resource display, select the Show avatar checkbox to show custom media that has been uploaded on the linked user accounts, or deselect it to display the resources’ initials instead.
- Click + Add line and then click the Select an option drop-down.
- Click the field to display under the resources’ names. Up to three fields can be added and fields can be removed by clicking the trash (bin) icon
 next to the line to delete. The preview updates as you make changes.
 - Click Save.
Customize which activities are included in the scheduled totals under the resource names in the swimlane
By default, the swimlane displays two scheduling totals:
- A sum of all scheduled work and activities for the period currently being viewed.
- A sum of the travel time for the period currently being viewed.
You can choose if activities should be included in the totals, and specify which items to include on a per-saved-view basis.
To change the activities that contribute to the scheduled totals in the swimlane, do the following steps:
- Navigate to Swimlane settings > Scheduled totals.
- Select the values that you would like to contribute to the scheduled work total in the swimlane. Custom activities are also available to select.
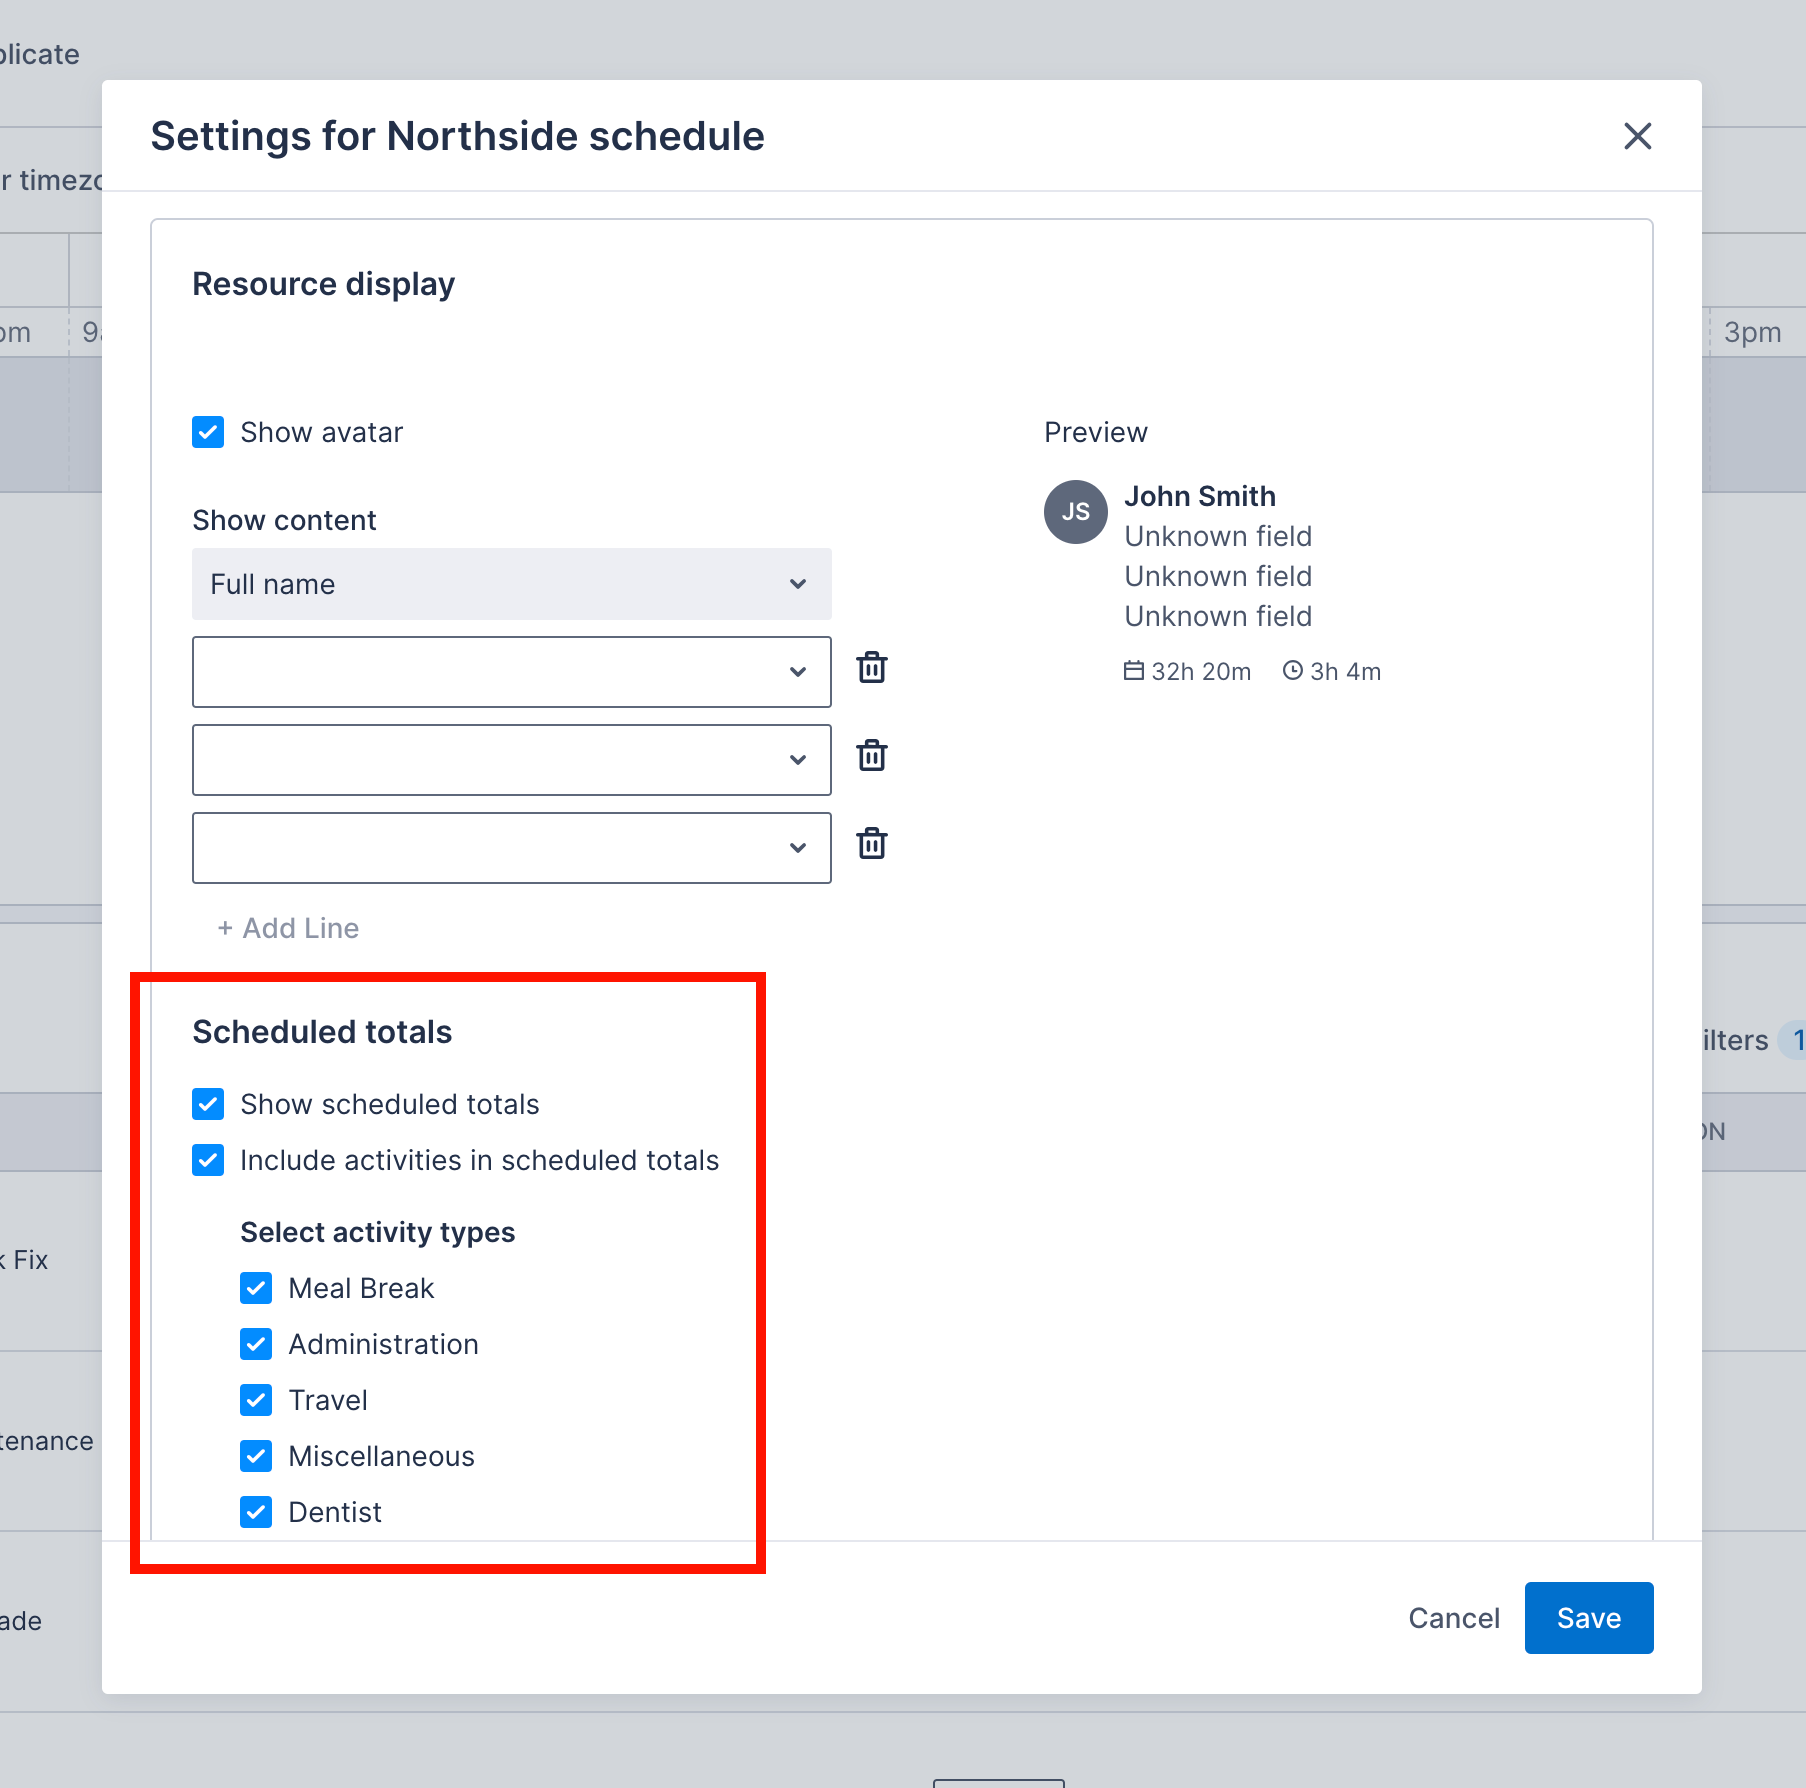
- Click Save.
Remove scheduled totals from the swimlane
By default, the swimlane displays scheduled totals below each resource’s record in the swimlane. If you would prefer not to disply these values, you can disable them on a per-saved-view basis.
To disable scheduled totals, do the following steps:
- Navigate to Swimlane settings > Scheduled totals.
- Click the Show scheduled totals check-box to de-select it.
- Click Save.
Change the work card appearance
Administrators can customize the color of work item cards in the swimlane in the web app settings. See the work card styling documentation for information on how to do this.
Feedback
Was this page helpful?